Category Archives: Intermediate

Articles for seasoned developers

Free FireDAC training online

FireDAC Training

Free FireDAC training online!

FireDAC is the Universal Data Access library for developing applications for multiple devices, connected to enterprise databases.

Starting tomorrow you can join the embarcadero team for free FireDAC training online in these special sessions, where you will be taken from a beginner to an expert by showing you how to utilise FireDAC in multiple situations.

Having used multiple database technologies over the years of developing with Delphi, I have been exceptionally impressed by the raw power of FireDAC and how fast and easy it makes the most difficult jobs as a database developer.

The sessions run every Thursday from Jan 22-Mar 26 in 3 time zones so no excuse for missing out!

Register now for free

Date Topic
January 22 Introduction to FireDAC
January 29 Monitoring and Tracing
February 5 Cached Updates and Auto-inc Fields
February 12 Array DML
February 19 Cascading Options System
February 26 Preprocessing
March 5 ETL
March 12 In-Memory Dataset
March 19 Local SQL
March 26 BDE to InterBase Migration


Register now for free

Free XE7 Trial

If your not a XE7 customer you can get the most out of these session by downloading a Delphi XE7 free trial here.

In-app purchase on Android and iOS

Jim Mckeeth recently recorded a developer skill sprint showing how to use In App purchase on Android and iOS.

Using the Capitals Quiz demo that ships with RAD Studio and Appmethod, he covered common scenarios of how to use in-app purchases to disable adverts, to purchase additional items, restore purchases that had been made on another device and also consume a purchased item, all using common code that works across Android and iOS.

There are loads of great notes on in App Purchase on docwiki

A summary of key steps

On Android

You need / see

  • An application license key ID (which is very long and may need splitting over two lines) – You need to upload your app to the Google Play store first (recommended as alpha) to get this key and then you can re-upload later on.
  • Unique product ID’s – which point to Managed products online
  • To create a key store and set this to be used in the Project Options.
  • (and also a number of other steps.. e.g setting up merchant account)

On iOS (iTunes)

You need / see

  • From the developer portal, you need the AppID (non wild card version) and need to ensure the App has InApp purchases enabled.
  • Use iTunes connect to create the purchase item, including setting price Tier
  • Add language and display name for the purchase, and also add in screen shots to show what happens.

Once setup you can call

  • InAppPurchase.PurchaseProduct() and pass in the ID for the product to purchase a product.
  • Define an InAppPurchase.OnPurchaseComplete event to define what happens once an item is purchased.
  • Query InAppPurchase.IsProductPurchased etc..

Other Resources

He does also mention that setting applications live can take a few hours.

Watch the replay here:

TTask.IFuture from the Parallel Programming Library

In my last post I spoke about TTask and how it enables us developers to quickly run multiple tasks at the same time with limited bottleneck in our applications. Moving on from that I want to explore IFuture which impletements ITask.

IFuture

IFuture , provides TTask with a structure us developers can use to creating a function that returns a specific type (defined using Generics, thats the <T> bit you see in code sometimes).  Using an instance of IFuture, the process can run and then allow us to get other stuff done, until such point as we need the result. This allows us to prioritise code blocks to run in the order we want them to, but still ensure we get the value we need at the point we need it!

Example

To get a value in the future, you first need to define what type of value, set it running and then go call it. To view this, below I am using a totally pointless (but shows how to use this feature) block of code, which I will break down step by step afterwards.

procedure TFormThreading.Button3Click(Sender: TObject);
var
 OneValue: IFuture <Integer>;
 OtherValue: Integer;
 Total: Integer;
begin
 OneValue := TTask.Future<Integer>(function: Integer
   begin
     Result := ComputeSomething;
     Sleep(1000); // delay to show status
   end);

 Memo1.Lines.Add(TRttiEnumerationType.
 GetName<TTaskStatus>(OneValue.Status));

 OtherValue := ComputeSomething;

 Memo1.Lines.Add(TRttiEnumerationType.
 GetName<TTaskStatus>(OneValue.Status));

 Total := OtherValue + OneValue.Value;

 Memo1.Lines.Add(TRttiEnumerationType.
 GetName<TTaskStatus>(OneValue.Status));

 // result
 Memo1.Lines.Add(Total.ToString);
end;

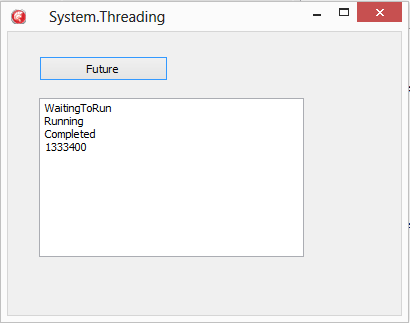
The output of this code looks something like this..

IFutures

Key points in the code

The first step, is using TTask.Future<T> to define the type to be returned, and then pass in the anonymous method to return the instance of that value. (Here we are getting an Integer from ComputeSomething so we use Integer as the type)

The output of calling TTask.Future is an instance of IFuture into the OneValue variable defined.

 OneValue := TTask.Future<Integer>(function: Integer
   begin
     Result := ComputeSomething;
     Sleep(1000); // delay to show status
   end);

OK, so putting a Sleep command in the anonymous method here is kind of pointless, but it does allow when running this demo code to see the result of the call to OneValue.Status change from WaitingToRun, to Running, to Completed.

As you read down further, you will see OneValue being queried for its current status. The code for converting our Future’s Status to a string is the same as any other Enumeration type, pass in the type you want to convert and the value to GetName.

TRttiEnumerationType.
 GetName<TTaskStatus>(OneValue.Status)

The first value returned will be WaitingToRun as everything is prepared. Following the first status query, we call the same ComputeSomething task

 OtherValue := ComputeSomething;

Afterwards, we can check the status of OneValue and see that (due to the sleep taking longer than the ComputeSomething call) its now reporting as running.

So hold on! Does that mean we need to check the status to see if its OK to get the value? Well actually NO 🙂

 Total := OtherValue + OneValue.Value;

This line asks OneValue for its Value. If it is done, it will have the value ready for you, if not (as in this case) it will block and wait for IFuture to finish before executing the code making life very easy on us developers.

So thats IFuture, its a process that you can set running, but will return at the point it is ready. Another way to save time and speed up your application code.

Using TTask from the Parallel programming library

In my last post on using Parallel Programming and the TParallel.For construct we learned about the new System.Threading unit and how to use TParallel to make looping faster.  There are however times when you need to run multiple tasks that are not loops, but these can run in parallel.

Running a number of processes in tandem has been greatly simplified with System.Threading.TTask and System.Threading.ITask

TTask provides a class to create & manage interaction with instances of ITask. You can choose to WaitForAll or WaitForAny to finish before proceeding in code.

To give an example. Imagine you have two tasks. A and B.
If A takes 3 seconds and B takes 5 seconds how long does it take to get a result to a user?

  • Sequentially (without TTask / ITask) = 8 seconds.
  • Using TTask.WaitForAll = 5 seconds
  • Using TTask.WaitForAny = 3 seconds

Depending on what your doing, the speed for return can be dramatically quicker. So lets look at a code example for WaitForAll.

procedure TFormThreading.MyButtonClick(Sender: TObject);
var
 tasks: array of ITask;
 value: Integer;
begin
 Setlength (tasks ,2);
 value := 0;

 tasks[0] := TTask.Create (procedure ()
   begin
     sleep (3000); // 3 seconds
     TInterlocked.Add (value, 3000);
   end);
 tasks[0].Start;

 tasks[1] := TTask.Create (procedure ()
   begin
     sleep (5000); // 5 seconds
     TInterlocked.Add (value, 5000);
   end);
 tasks[1].Start;

 TTask.WaitForAll(tasks);
 ShowMessage ('All done: ' + value.ToString);
end

The above example uses an Array of ITask to process a set of tasks. The result returned is 8000, but despite 8 seconds worth of sleep commands, the first 3 seconds run in parallel, leaving the second task to finish before returning 2 seconds later, which equates to a 3 second gain on sequentially running the two tasks; and all of this without having to create your own custom threads and managing them return. 🙂

While speeding up a task to run before returning is good, you can also use TTask to prevent the user interface locking up if you want to start something in the background.  To do this, you can just run a single task and start it, for example

procedure TFormThreading.Button1Click(Sender: TObject);
var
 aTask: ITask;
begin
 // not a thread safe snippet
 aTask := TTask.Create (procedure ()
   begin
     sleep (3000); // 3 seconds
     ShowMessage ('Hello');
   end);
 aTask.Start;
end;

This second example, if used, would allow the user to press the button multiple times resulting in multiple ShowMessage calls, however, used with care this is a powerful way to run task. This is also an example of asynchronous programming where you can start the Task, get on with other stuff, and then deal with the result as it returns.

ITask

ITasks provide a range of methods and properties to Start, Wait, Cancel and also a property for Status (Created, WaitingToRun, Running, Completed, WaitingForChildren, Canceled, Exception)

As ITask is an interface, you can always create your own classes that use ITask if you so wish, providing great flexibility to the frame work.

Parallel Programming with Delphi XE7; a quick introduction

Everyone knows that typically device / computers today have multiple CPU’s, even my phone has 4! But when it comes to programming to get full benefits of working across those cores its often been a little tricky or time consuming and extra code overhead to manage.  Well… that is until now with Parallel Programming with Delphi!

Starting with Delphi, C++ Builder and RAD Studio XE7, there is a new library that simplifies the effort needed to get tasks running in parallel, aptly named the Parallel Programming Library.

The Parallel Programming Library lives within the System.Threading unit and is made up of a number of new helpful features that can be easily introduced into new and also existing projects. There are also loads of overloaded arguments for fine tuning and supporting C++ working with this as well as Object Pascal.

These features include a new Parallel for loop that is easy to uses, along side a number of more advanced features for running tasks, joining tasks, waiting on groups of tasks etc to process. Under the hood there is a thread pool that self tunes itself automatically (based on the load on the CPU’s).

To give you an idea about how easily this is to plug in, lets take a simple example where you want to work out if a number is a prime number.

function IsPrime (N: Integer): Boolean;
var
 Test: Integer;
begin
 IsPrime := True;
 for Test := 2 to N - 1 do
   if (N mod Test) = 0 then
   begin
     IsPrime := False;
     break; {jump out of the for loop}
   end;
end;

The traditional way to loop  and check for the number of prime numbers between 1 to X value would be to do something like this where each number is checked in sequence and the total stored into a variable (here Tot is an integer)

const
 Max = 50000; // 50K

for I := 1 to Max do
 begin
   if IsPrime (I) then
     Inc (Tot);
 end;

Using the new Parallel library, this can be achieved by replaces the “for” command with a call to the class function TParallel.For passing in the code to be run as an anonymous method.

In addition, to avoid clashes with multiple threads running, you can call TInterlocked.Increment.

TParallel.For(1, Max, procedure (I: Integer)
 begin
   if IsPrime (I) then
     TInterlocked.Increment (Tot);
 end);

So what difference does this make?

Using TStopWatch from System.Diagnostics we are able to test the time to run each version of the loop above. Even on my VM running only 2 cores the time drops from 415ms for the standard for loop down to 192ms using the Parallel programming library version. On my Mac where there are more cores available it goes from 382ms down to 90ms for the same test!

What I love about this, is this is a really easy solution to plug into existing code as its part of the language and framework.

The great thing about writing native code is that we can take advantage of all the cores on a device. 🙂 Including Mobiles! However, as a word of caution, use it only where you need to on mobile as it will use more battery if you are running multiple threads heavily.

Samples

An other example that can help get your head around how to use the Parallel Programming library is a sample of Conways game of life for both Object Pascal and C++ in the samples directory shipped with XE7, located in the RTL samples. e.g.

C:\Users\Public\Documents\Embarcadero\Studio\15.0\Samples\Object Pascal\RTL\Parallel Library
C:\Users\Public\Documents\Embarcadero\Studio\15.0\Samples\CPP\RTL\Parallel Library

Not sure about you, but I’m off to speed up some processing in some old projects I have 🙂 Happy coding!

Calling JNI and Java API’s with Delphi and Appmethod

Following on from the iOS specific session that spoke about iOS and talking to Objective C API’s, Jim McKeeth has done a session on Java and the JNI (Java Native Interface) bridge to the Java API’s.

He speaks about conditional defines and how to use JNI to speak to a custom set of Java Libraries. While mainly in Object Pascal, the same technique is used to access via C++ and demos are done in both language.

The video covers the creation of class methods and regular methods that are then used with the TJavaGenericImport class to bring them all together ready for importing. (A walk through is also provided on DocWiki)

http://docwiki.embarcadero.com/RADStudio/XE6/en/Using_a_Custom_Set_of_Java_Libraries_In_Your_RAD_Studio_Android_Apps

The example in the video covers a string being Base64 encoded using a JNI call. For the steps to create the custom classes.dex file  you can also see Jim’s blog post at http://delphi.org/2014/07/custom-classes-dex/

Returning specific rows of data with InterBase

Ever wanted to select specific rows from a dataset? Well InterBase has some very cool features in the SQL syntax  that allows you to do just that!

Paging Data

Adding the ROWS command to the end of your SQL statement (as per the example below) will return a specific number of records. For examples, to fetch the first 10 records just add rows 10.

Select * from MyTable
rows 10;

When you want to get the next 10 records you can use the extended syntax with the “to” command.

Select * from MyTable
rows 11 to 20;

The second query can obviously be used to fetch records 1 to 10 as well and is very useful when combined with a parameterised query to allow restful paging of data sets.

Fetching Page Headers

Now, say you wanted to get the first record of every page of data, you can also easily do this by adding an additional optional parameter “by” for example

Select * from MyTable
rows 1 to 100 by 10;

The above statement would return records 1, 11, 21, 31 etc… for the total records up to 100th record.

You can also skip records to return by a percentage of the dataset result size by simply adding “PERCENT” to the end of the above statement.

Select * from MyTable
rows 1 to 100 by 7 PERCENT;

Getting the top 10

But what if you want to use ROWS to get the top 10? Well, you can easily select 10 records, but what if the 11th and 12th record have the same value as the 10th? They should be returned as well, but how?

InterBase supports this easily by adding “WITH TIES”. To use “WITH TIES” you also need to include an “ORDER BY” clause to indicate what field to measure the ties on.  For example, to get the top 10 sales people by a field storing the sales_booked, you could run the following statement.

Select * from salespeople
order by sales_booked desc
rows 10 with ties;

This will include the top 10 and also anyone with sales_booked matching the 10th record.

Getting the first 10 percent

Following on, the first 10% of records can be returned by using the following syntax.

Select * from salespeople
rows 10 percent;

While getting 10% of records is a nice feature, combining this with the “ORDER BY” and “WITH TIES” makes a very easy way to select the top 10% of sales people (for example) rather than the top 10.

Summary

There are some very cool features in the InterBase language for defining the specific size and scope of data to return that lend itself nicely to a range of useful implementations around statistics and restful data service development.

For more fun details on the InterBase language, check out the language reference guide on http://docs.embarcadero.com/products/interbase