The IoT Award Winning database InterBase, has for a long time supported the ability to store data in an array field type. This was originally introduced as a new field type to reduce API calls and speed up data write time for a specific Boeing project many years ago. Writing each value into an array can also simplified the data model as well as benefiting database performance.
While array field in InterBase have been around for a long time, they have not aways been that easy to access from the components layer reducing their adoption.
We (geeks) should all know that applications that run in memory run faster than those that have regular disk I/O.
Having more of the data processing in memory has a positive effect on speed and performance, however its not without risk. As memory is transient, you are always at risk of data loss if the data in memory hasn’t been saved to disk (which is where you get the disk i/o speed degradation again.
InterBase brings together the speed of in memory data processing with the security of immediate disk I/O with InterBase Journaling. The write ahead logging enables InterBase to securely log the write transactions to the journal making the best of both worlds possible.
I was recently asked how to connect to InterBase from Visual Studio, and while its not something I have done before, luckily I know a man who has. – Thanks to Gabe Goldfield for checking the example below with InterBase XE7 and Visual Studio 2013 Ultimate.
Connecting to InterBase from Visual Studio
InterBase currently supports an ADO.Net driver that works with InterBase XE, XE3 and XE7 providing both 32bit and 64bit support. Full details here.
InterBase project DeltaForce, named due to its new patent pending technology for tracking and querying of deltas, is a highly scalable, low footprint answer to a number of distributed data set questions.
I’m really excited about what we have coming up in the InterBase XE7 preview events. I will be hitting the road over the coming weeks in person to present and talk to developers, system architects etc about what InterBase DeltaForce (XE7) can help you achieve and how it can dramatically assist you throughout the product life cycle.
InterBase XE7 First Look – LIVE!
I will be in the following cities over the next few weeks for live preview workshops
The CodeRage 9 videos are now available for reply online via YouTube. To save you searching, the InterBase CodeRage 9 links I did are below; For the full list of videos from CodeRage 9 please visit the Embarcadero Community blog post for CodeRage 9
The C++ programming version demo’ed requires the data module from the Object Pascal code, so once I’ve cleaned that up I’ll post that as well.
The IBLite example code works on Windows, Mac OS X, iOS and Android. The session replays are available online via the CodeRage website. – More on the InterBase sessions in my previous post
CodeRage is a fantastic Object Pascal programming and C++ Programming event – highly recommended for any developer, and best of all – REGISTRATION IS FREE!!
Missed it or got a meeting? – Don’t worry, register and you can still get to see the replays!
My two InterBase CodeRage Sessions!
I will be presenting two InterBase CodeRage sessions on Thursday 30th November 2014
the InterBase Keynote (8am Pacific / 4pm UK / 5pm CET) where we will be revealing some of the exciting new developments we are working on with InterBase with project DeltaForce!
I will also be talking about InterBase’s free edition that can be used on Windows, Mac OS X, Android and iOS – IBLite in the session Embedding local and remote data access into your applications with IBLite (3pm – C++ & 6pm – Object Pascal)
For times and details of all sessions visit the CodeRage website – See you there!!
When developing software for multiple platforms you often need to debug and run applications on machine and devices that are not your development PC. The RAD Studio and Appmethod approach to this is an ingenious little program that acts as a go-between from the IDE to the remote device / machine. Called PAServer (PA = Platform Assistant) allows the IDE to retrieve the full call stack at run time, pause code with break points, inspect values etc, exactly as you would do debugging a local application.
PA Server is often used on a Mac OS X target for running and debugging applications to Mac OS X, iOS Simulator and iOS Devices, however there is also a windows version of PAServer and this can also be used to simplify preparing for deployment.
PA Server runs over TCP/IP and while developers often use it for local network work, in theory there is no reason why you can not use it to remote debug that trouble some customer where you can’t quite recreate what they are doing. (as long as they are happy for you to install the PA Server client on their machine).
PA Server is also great for deploying files directly to a remote machine when used with the Deployment Options for the project. This ensures that all the files specified are pushed remotely. This is great for updating a remote server or internal build machines.
Installation of PAServer
PA Server needs to be installed on the machine you want to run applications on remotely The install files both Windows and Mac OS X are located in the PAServer folder under your Appmethod / RAD Studio / Delphi / C++ Builder installation. e.g. with RAD Studio XE7 they are located at C:\Program Files (x86)\Embarcadero\Studio\15.0\PAServer.
Both installers (Windows / Mac OS X) just require you to push the next button a few times to install the server.
Running PA Server remotely…
PA Server is ultimately a Console application that you launch, enter a session password (that remote developers will need to connect to the session) and leave running without having to go back to it, but this is how to launch it on each platform.
..on MAC OS X
To launch PAServer on a Mac you have two choices.
Go to “Applications” and choose PAServer 15.0 (for XE7)
Use the new GUI in LaunchPad called PAServer Manager
If you use PAServer Manager you will see the icon appear at the top of your screen in the menu bar. Clicking on this allows you to “Add Server” (I just call it MyMac by default) and then start and stop the services as well as other useful things like viewing the information (such as IP Address etc). A lot easier than remembering command codes.
PA Server Manager is also useful for managing groups of developers who want to run multiple instances of PA Server on the same machine when developing.
..On Windows
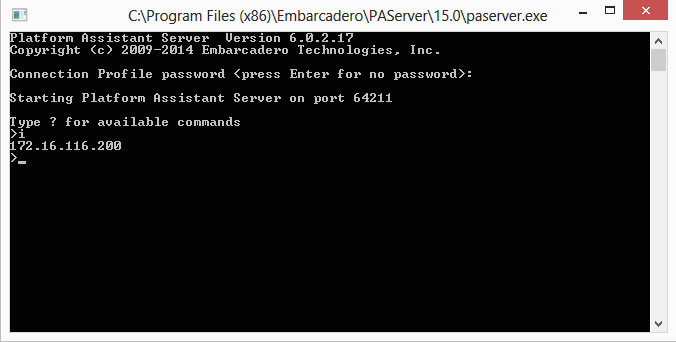
To launch PA Server on windows once installed, you need to browse to the PAServer folder (typically C:\Program Files (x86)\Embarcadero\PAServer\15.0) and double click on the PAServer application.
PAServer running on Windows
Connecting to PAServer running on a Windows machine from the IDE
With PA Server installed, opened and a password set for the session, it is possible to make the remote connection (or even a loopback for a more advanced local test). To achieve this we need to configure a profile for connecting to the remote PAServer instance. – this is really quick to do.
Firstly select the desired compilation target of Win32 or Win64 in the Project Manager, and then right click and choose properties. The platform properties window is then opened allowing you to choose a profile for the target.
By default you will need to choose “Add New…” under platforms the first time you run this step, subsequently you will already have the profile saved.
Following the wizard for Add New, you can enter a name (e.g. MyPC) and then the IP address (port 64211 should be default unless you have changed it during install). Once you have the IPAddress or pc name entered you can “Test Connection” to verify that the path is working correctly.
If this fails then check you IP Address is correct – if unsure type “i” into the PAServer console and hit enter to get a list of the listening IPAddresses and check your firewall.
Once you have selected the Platform Profile and its tested, all you need to do is hit run just like before. Rather than deploying to your project directory, deploying to PA Server sends out all the files into a the PAServer scratch directory (under Documents\PAServer) e.g. C:\Users\Steve\Documents\PAServer\15.0\scratch-dir\
Tip for making things simple?
If you have selected any feature files or added your own files under Deployment Options when developing your applications, e.g. enabling InterBase, IBLite or DBExpress etc. These files will be packaged up for you when running out to PAServer giving you a complete folder structure with files ready for packaging. This also makes testing locally a lot lot simpler 🙂
Getting back to normal
Once you are done testing against a remote profile you can easily return to running locally by right clicking on the target and choosing to Revert to Default Connection.
Programming with Delphi & InterBase
This website uses cookies to improve your experience. We'll assume you're ok with this, but you can opt-out if you wish.AcceptRead More
Privacy & Cookies Policy
Privacy Overview
This website uses cookies to improve your experience while you navigate through the website. Out of these, the cookies that are categorized as necessary are stored on your browser as they are essential for the working of basic functionalities of the website. We also use third-party cookies that help us analyze and understand how you use this website. These cookies will be stored in your browser only with your consent. You also have the option to opt-out of these cookies. But opting out of some of these cookies may affect your browsing experience.
Necessary cookies are absolutely essential for the website to function properly. This category only includes cookies that ensures basic functionalities and security features of the website. These cookies do not store any personal information.
Any cookies that may not be particularly necessary for the website to function and is used specifically to collect user personal data via analytics, ads, other embedded contents are termed as non-necessary cookies. It is mandatory to procure user consent prior to running these cookies on your website.