Swagger UI (as previously discussed) is a great option for checking your documentation and working with the REST API. One of the challenges has always been CORS (Cross Origin Resource Sharing) that makes execution of the code a challenge when developing.
There are a few options now however. You can either work around this with browser plug-ins, (as seen before), enable CORS in the emsserver.ini under [Server.APICrossDomain], or embed swagger-ui inside your RAD Server instance.
In this video, I cover the latter option. You can watch how to get documentation up and running. The video shows how to configure your EMSServer.ini to share the external resource through RAD Server and also modify the downloaded files to automatically load up the API documentation directly from RAD Server.
WebFiles in RAD Server EMSServer.ini
The key to making this work is the WebFiles option that was added to RAD Studio in 10.3.2. This was primarily added to make it easier to serve out web content and support ExtJS for doing web client development under the Architect edition of RAD Studio, however, this also has the benefit of making other content available to share.
Delphi Boot Camp add’s YouTube and Facebook streams to service demand.
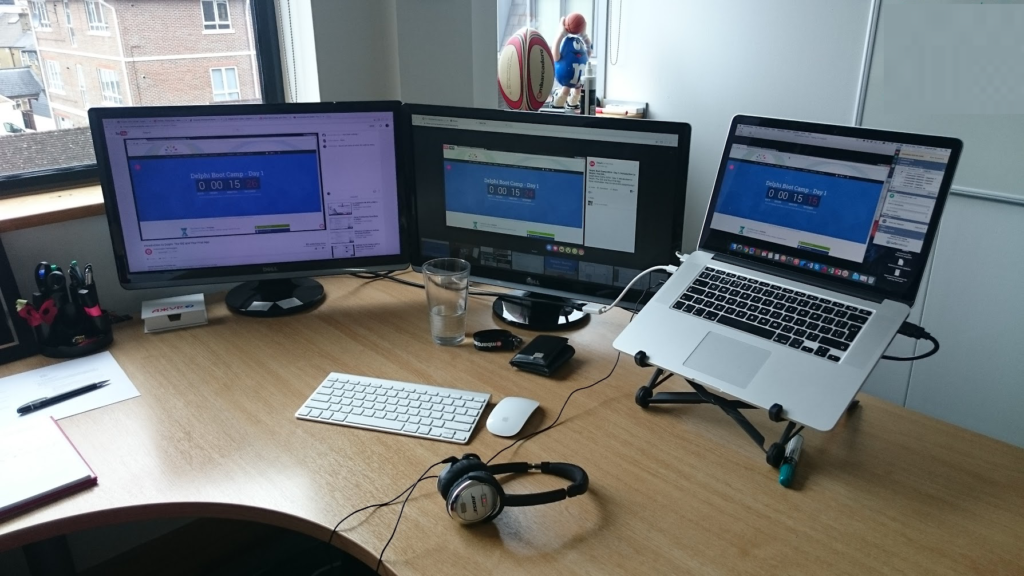
Today was very exciting in the Embarcadero offices. Developers have been registering for Delphi Boot Camp in their thousands, with over 1000+ registering in the last weekend alone.
Having all this interested in Delphi is awesome, but also has raised quite a challenge for the team delivering Boot Camp due to physical viewing limitations in GoToWebinar. The decision was taken last week that we should add additional ways to stream this out to the 1000’s who were going to attend and Jim McKeeth started off looking into YouTube and Facebook streaming.
My Laptop setup with YouTube, Facebook and GoToWebinar
This morning, all attendees received an update email with the multiple streaming options included. During the first of the two live daily sessions we have seen huge numbers viewing on both Facebook and YouTube.
If you couldn’t get into GoToWebinar, either try the second session or watch the replay on YouTube later, keep an eye on community for the replays.
If you did watch the Boot Camp on YouTube, thank you to everyone who joined in with such fun discussions. (my personal favourite question was “So can I talk to Dolphins with this?” – I’ve seen some cool delphi apps, but that would be a nice hardware integration project) Please let us know what you think about these medias for the future.
You can also use the Starer Edition to qualify for upgrade pricing to RAD Studio or Delphi Pro / Enterprise or Architect editions. And with the mobile add on pack included along with the bonus pack, now is a great time to do that.
Join Embarcadero experts and leading community MVP’s for 5 workshops from Monday 5th September to Friday 9th September.
Focusing on getting stared and using the FMX framework to create cross platform ready code, Delphi Boot Camp is a great way to learn new skills and ask leading experts direct questions on application development.
Date
Session
Presenters
5th Sept
Introduction to Delphi: The IDE and Your First App
David I
6th Sept
Getting to Know the Delphi Language
Marco Cantu
7th Sept
Building Effective User Interfaces with FireMonkey
To help you with your study at boot camp. Embarcadero are also making Delphi Starter Edition available with 100% discount! All you need to do is register, download and install your Delphi license! But don’t stop there!
Marco Cantu’s Object Pascal hand book!
The final part of the Boot Camp is the programming book! Delphi is the home to modern Object Pascal programming and you can get up to speed with the modern Delphi / Object Pascal language with the help of Marco Cantu’s awesome handbook.
Marco Cantu is the Delphi Product Manager and world leading Delphi expert. His ever popular Object Pascal handbook is available as a free e-download for the duration of the course to anyone on Starter edition! All you need to do is register, download and install the Delphi Starter Edition and then visit Code Central registered user downloads. To get you there quicker, click http://cc.embarcadero.com/item/30605.
So you want to build a new REST server (using Delphi or C++) and want it to become really popular and easily used by other developers. Imagine….
Your building a new REST server,
You have to document the API’s
You have to keep the documentation updated
To aid adoption of your services you want to create examples for other developers to connect into your server quickly
With the release of RAD Studio 10.1 Berlin, it is now possible to do all the above thanks to the new documentation attributes used in EMS packages that create YAML documentation that can be used with Swagger.
What is YAML?
YAML: (rhymes with “camel”) YAML Ain’t Markup Language
In short, YAML is a human friendly data serialization standard for all programming languages that is a subset of JSON.
Both JSON and YAML aim to be human readable data interchange formats. However, JSON and YAML have different priorities. JSON’s foremost design goal is simplicity and universality. Thus, JSON is trivial to generate and parse, at the cost of reduced human readability. It also uses a lowest common denominator information model, ensuring any JSON data can be easily processed by every modern programming environment.
In contrast, YAML’s foremost design goals are human readability and support for serializing arbitrary native data structures. Thus, YAML allows for extremely readable files, but is more complex to generate and parse. In addition, YAML ventures beyond the lowest common denominator data types, requiring more complex processing when crossing between different programming environments.
YAML can therefore be viewed as a natural superset of JSON, offering improved human readability and a more complete information model. This is also the case in practice; every JSON file is also a valid YAML file. This makes it easy to migrate from JSON to YAML if/when the additional features are required.
What is Swagger?
Swagger is a simple yet powerful representation of your RESTful API, and as part of the open tools initiative (joining November 2015) it is backed by members such as Microsoft, Google, PayPal and IBM.
Using a YAML document, you can create Swagger instance of your API.
With the largest ecosystem of API tooling on the planet, thousands of developers are supporting Swagger in almost every modern programming language and deployment environment making it a great choice to make your REST server easily integrated and used by others.
With a Swagger-enabled API, you get interactive documentation, client SDK generation and discoverability.
Creating YAML with Delphi / C++ Builder
To gain the benefits of Swagger you need to create the YAML documentation; this is achieved using a number of new attributes defined on the custom API’s you are creating. The three core Custom API Documentation attributes are:
In addition there are two additional documentation elements that allow you to define EndPointObjects that are used by your API. This way you define structures that are returned, rather than just returning simple types.
With Rad Studio 10.1 Berlin, in the samples, there is a new demo that covers the above custom api documentation attributes. If you want to open it in the IDE, choose “Open a sample project” and browse to the following folder and open the APIDocDelphiAttributes.bpl package (cpp equivalents also available, swap Delphi for CPP in names).
\Samples\Delphi\Database\EMS\APIDocAttributes
As this sample uses InterBase, you need to make sure you have started InterBase. If its not running, use the IBServerManager to make sure its running.
Rather than cover each of the attributes here, and repeat the documentation, I’ll leave you explore the links above to read up on these attributes, instead I want to use this sample to explore the YAML using Swagger UI, but first lets get the YAML document by running the sample.
Getting YAML from EMS Sample
Compile and run (F9) the sample project and choose Open Browser. You should now see a call to http://localhost:8080/version showing version 2.1 or higher.
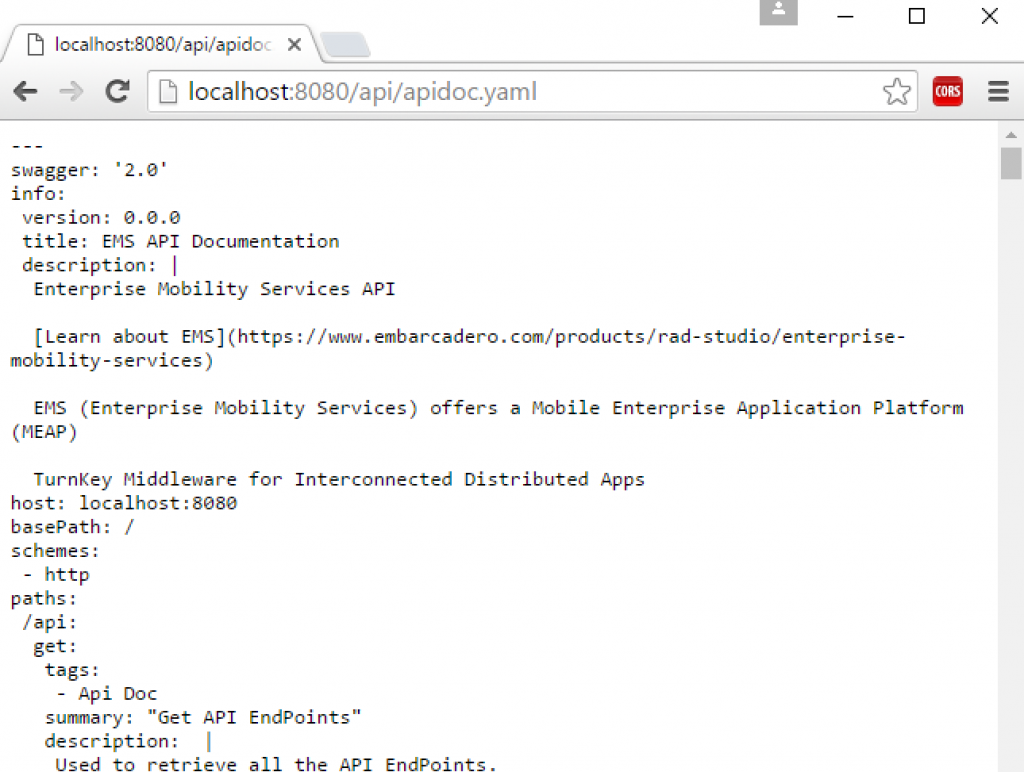
To get the documentation from the server, navigate to http://localhost:8080/api where you will see the different documentation types supported.
This shows 2 currently. apidoc.yaml and apidoc.json. Add these to the end of the API url to see how they look. e.g. http://localhost:8080/api/apidoc.yaml
http://localhost:8080/api/apidoc.yaml returning YAML from use with Swagger from EMS
YAML to Swagger UI
So you have a YAML document.. now what? Swagger UI is a great tool for reading the YAML document and giving you interactive HTML documentation for your RESTful API.
Unzip the download on your development machine / vm. In there locate the dist folder and open the index.html
A note on CORS
Now before we go any further, your need to be aware of CORS – Cross Origin Resource Sharing. In short, because we will want to enable PUT, POST, DELETE from outside the core domain, we need to allow CORS (or you will not be able to call EMS)
You can either update the EMS configuration to allow CORS or install the following google chrome plugin. If you install the plugin, once you have the SwaggerUI index.html page open, you need to make sure its enabled. (i’ve sometimes found I’ve had to disable and re-enable it to get it to work).
Enabling CORS using Google Chrome Plugin
Loading the YAML into Swagger
Copy the URL for the YAML document and post it into your SwaggerUI/dist/index.html page, and choose Explore.
The sample (pet store) documentation in SwaggerUI will now be replaced with the documentation form the EMS server.
You can now browse and invoke the API calls directly from the SwaggerUI interface. The example creates a category called Sample Tag (which you can see listed) All the other categories cover the default features of EMS, including User security, and the new ThingPoint EdgeModule API’s
Visualising YAML in Swagger UI
You can now explore the categories, review the documentation model that defines the structure being return (thanks to the EndPointObjectXXX attributes)
… and once you fill in any defined parameters you can “Try It Out”. This shows the URL called, and also the response body!
Trying out Swagger UI
That is it! How simple to test you RESTful API than by using YAML and Swagger UI.
You can now explore Swagger.IO and learn about the other languages that you can create connections into your EMS server with 🙂
Ever since Delphi XE2, it has been possible to generate Delphi 64bit applications from the same code base as your traditional Windows 32bit Delphi code. The business case for 64-bit for business is covered in this tech paper The Impact of 64-bit Applications to your Company’s Bottom Line.
On the whole moving to 64bit (on iOS or Windows) is beautifully simple to achieve! It can be just as simple as adding the Delphi 64bit Windows target platform in the project manager and rebuilding the project.
My experience from talking to many developers who have moved up is that normally there are a few things to check in your code but typically its not a massive task to get compiling and ready to test.
A lot has been recorded on moving from Windows 32bit to Windows 64bit Delphi and this should be a useful summary if your just planning now moving up from older versions of Delphi to Delphi 10. If you are building iOS applications, then you will need to use the 64bit build now to get into the AppStore. Thankfully, Delphi has made the task of using 64bit very simple across all platforms and protected us from the headaches non Delphi Developers have had on the whole.
Lets start with this short video from David I who covers some the foundations in 7 minutes!
We (geeks) should all know that applications that run in memory run faster than those that have regular disk I/O.
Having more of the data processing in memory has a positive effect on speed and performance, however its not without risk. As memory is transient, you are always at risk of data loss if the data in memory hasn’t been saved to disk (which is where you get the disk i/o speed degradation again.
InterBase brings together the speed of in memory data processing with the security of immediate disk I/O with InterBase Journaling. The write ahead logging enables InterBase to securely log the write transactions to the journal making the best of both worlds possible.
In FireMonkey, Bitmap is the common currency for working with images. If you want to send an image via Stream using LiveBindings or want to save an Image to disk or into a database on a device with limited storage however, they are quite large.
Thankfully FireMonkey has a really easy to use CodecManager that allows you to SaveToFile or SaveToStream and convert to PNG or JPG across all platforms (which are vastly smaller in size).
SaveToFile
Creating a PNG, JPG/JPEG is as simple as calling the Bitmap.SaveToFile with the correct file extension. This works really well with even more extensions supported.
Personally I would use PNG as the JPG formats are around the same size on some test I’ve run, but produce a better quality of image, especially when grabbing screenshots.
SaveToStream and TBitmapCodecManager
Bitmap.SaveToStream doesn’t expose the CodexManager in the same way as it is available automatically with the SaveToFile option so takes a little more work to get a compressed image into the memory stream.
This is done using the TBitmapCodecManager class. A simple screen test has gone from over 1mb as a bitmap to around 6kb when saved to PNG using this approach.
The following code is an example using two image viewers (and a few save to files to help demonstrate the difference in file size). The key part is the TBitmapSurface and TBitmapCodecManager.
procedure TForm1.Button1Click(Sender: TObject);
var
Stream: TMemoryStream;
Surf: TBitmapSurface;
aFile : string;
begin
ImageViewer1.Bitmap :=
TabControl1.MakeScreenshot;
// Comparison save file as BMP
aFile := 'c:\test\myImage';
ImageViewer1.Bitmap.SaveToFile(aFile+'.bmp');
Stream := TMemoryStream.Create;
try
Stream.Position := 0;
Surf := TBitmapSurface.Create;
try
Surf.Assign(ImageViewer1.Bitmap);
// use the codec to save Surface to streamifnot TBitmapCodecManager.SaveToStream(
Stream,
Surf,
'.png') thenraise EBitmapSavingFailed.Create(
'Error saving Bitmap to png');
finally
Surf.Free;
end;
// do something with the png stream image
Stream.Position := 0;
ImageViewer2.Bitmap.LoadFromStream(Stream);
// comparison output as PNG from the stream
Stream.Position := 0;
Stream.SaveToFile(aFile+'.png');
finally
Stream.Free;
end;
end;
Now, you can obviously save as a ‘PNG’ from the bitmap, but the above code shows how to avoid saving a file to disk unless you really need to.
Happy coding!
Programming with Delphi & InterBase
This website uses cookies to improve your experience. We'll assume you're ok with this, but you can opt-out if you wish.AcceptRead More
Privacy & Cookies Policy
Privacy Overview
This website uses cookies to improve your experience while you navigate through the website. Out of these, the cookies that are categorized as necessary are stored on your browser as they are essential for the working of basic functionalities of the website. We also use third-party cookies that help us analyze and understand how you use this website. These cookies will be stored in your browser only with your consent. You also have the option to opt-out of these cookies. But opting out of some of these cookies may affect your browsing experience.
Necessary cookies are absolutely essential for the website to function properly. This category only includes cookies that ensures basic functionalities and security features of the website. These cookies do not store any personal information.
Any cookies that may not be particularly necessary for the website to function and is used specifically to collect user personal data via analytics, ads, other embedded contents are termed as non-necessary cookies. It is mandatory to procure user consent prior to running these cookies on your website.