The IoT Award Winning database InterBase, has for a long time supported the ability to store data in an array field type. This was originally introduced as a new field type to reduce API calls and speed up data write time for a specific Boeing project many years ago. Writing each value into an array can also simplified the data model as well as benefiting database performance.
While array field in InterBase have been around for a long time, they have not aways been that easy to access from the components layer reducing their adoption.
Part of the very fast FireDAC database component library is TFDFileStream,a class that allows high performance access to trace files, (TFDMoniFlatFileClientLink), text data file reading (TFDBatchMoveTextReader / TFDBatchMoveTextWrtiter), SQL Script file reading (TFDScript) and data serialization to file (TFDMemTable etc). Well, it seems it was too good to keep hidden and with the release of 10.1 Berlin, this has been moved from FireDAC.Stan.Util to System.Classes and has been renamed to TBufferedFileStream.
So you want to build a new REST server (using Delphi or C++) and want it to become really popular and easily used by other developers. Imagine….
Your building a new REST server,
You have to document the API’s
You have to keep the documentation updated
To aid adoption of your services you want to create examples for other developers to connect into your server quickly
With the release of RAD Studio 10.1 Berlin, it is now possible to do all the above thanks to the new documentation attributes used in EMS packages that create YAML documentation that can be used with Swagger.
What is YAML?
YAML: (rhymes with “camel”) YAML Ain’t Markup Language
In short, YAML is a human friendly data serialization standard for all programming languages that is a subset of JSON.
Both JSON and YAML aim to be human readable data interchange formats. However, JSON and YAML have different priorities. JSON’s foremost design goal is simplicity and universality. Thus, JSON is trivial to generate and parse, at the cost of reduced human readability. It also uses a lowest common denominator information model, ensuring any JSON data can be easily processed by every modern programming environment.
In contrast, YAML’s foremost design goals are human readability and support for serializing arbitrary native data structures. Thus, YAML allows for extremely readable files, but is more complex to generate and parse. In addition, YAML ventures beyond the lowest common denominator data types, requiring more complex processing when crossing between different programming environments.
YAML can therefore be viewed as a natural superset of JSON, offering improved human readability and a more complete information model. This is also the case in practice; every JSON file is also a valid YAML file. This makes it easy to migrate from JSON to YAML if/when the additional features are required.
What is Swagger?
Swagger is a simple yet powerful representation of your RESTful API, and as part of the open tools initiative (joining November 2015) it is backed by members such as Microsoft, Google, PayPal and IBM.
Using a YAML document, you can create Swagger instance of your API.
With the largest ecosystem of API tooling on the planet, thousands of developers are supporting Swagger in almost every modern programming language and deployment environment making it a great choice to make your REST server easily integrated and used by others.
With a Swagger-enabled API, you get interactive documentation, client SDK generation and discoverability.
Creating YAML with Delphi / C++ Builder
To gain the benefits of Swagger you need to create the YAML documentation; this is achieved using a number of new attributes defined on the custom API’s you are creating. The three core Custom API Documentation attributes are:
In addition there are two additional documentation elements that allow you to define EndPointObjects that are used by your API. This way you define structures that are returned, rather than just returning simple types.
With Rad Studio 10.1 Berlin, in the samples, there is a new demo that covers the above custom api documentation attributes. If you want to open it in the IDE, choose “Open a sample project” and browse to the following folder and open the APIDocDelphiAttributes.bpl package (cpp equivalents also available, swap Delphi for CPP in names).
\Samples\Delphi\Database\EMS\APIDocAttributes
As this sample uses InterBase, you need to make sure you have started InterBase. If its not running, use the IBServerManager to make sure its running.
Rather than cover each of the attributes here, and repeat the documentation, I’ll leave you explore the links above to read up on these attributes, instead I want to use this sample to explore the YAML using Swagger UI, but first lets get the YAML document by running the sample.
Getting YAML from EMS Sample
Compile and run (F9) the sample project and choose Open Browser. You should now see a call to http://localhost:8080/version showing version 2.1 or higher.
To get the documentation from the server, navigate to http://localhost:8080/api where you will see the different documentation types supported.
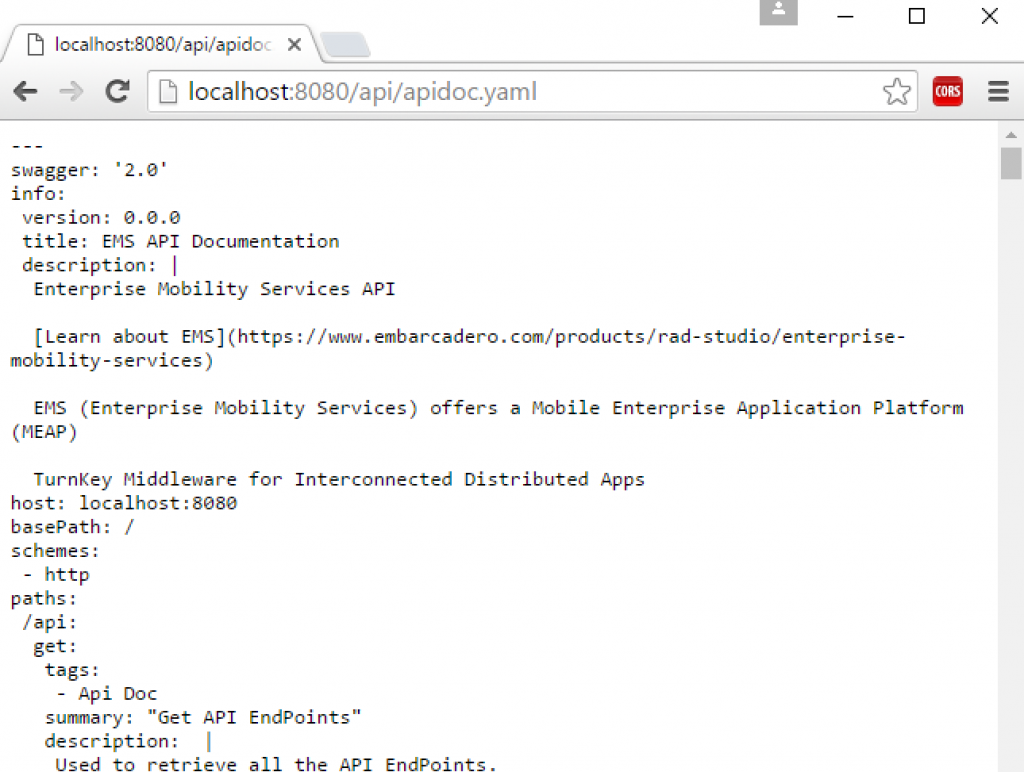
This shows 2 currently. apidoc.yaml and apidoc.json. Add these to the end of the API url to see how they look. e.g. http://localhost:8080/api/apidoc.yaml
http://localhost:8080/api/apidoc.yaml returning YAML from use with Swagger from EMS
YAML to Swagger UI
So you have a YAML document.. now what? Swagger UI is a great tool for reading the YAML document and giving you interactive HTML documentation for your RESTful API.
Unzip the download on your development machine / vm. In there locate the dist folder and open the index.html
A note on CORS
Now before we go any further, your need to be aware of CORS – Cross Origin Resource Sharing. In short, because we will want to enable PUT, POST, DELETE from outside the core domain, we need to allow CORS (or you will not be able to call EMS)
You can either update the EMS configuration to allow CORS or install the following google chrome plugin. If you install the plugin, once you have the SwaggerUI index.html page open, you need to make sure its enabled. (i’ve sometimes found I’ve had to disable and re-enable it to get it to work).
Enabling CORS using Google Chrome Plugin
Loading the YAML into Swagger
Copy the URL for the YAML document and post it into your SwaggerUI/dist/index.html page, and choose Explore.
The sample (pet store) documentation in SwaggerUI will now be replaced with the documentation form the EMS server.
You can now browse and invoke the API calls directly from the SwaggerUI interface. The example creates a category called Sample Tag (which you can see listed) All the other categories cover the default features of EMS, including User security, and the new ThingPoint EdgeModule API’s
Visualising YAML in Swagger UI
You can now explore the categories, review the documentation model that defines the structure being return (thanks to the EndPointObjectXXX attributes)
… and once you fill in any defined parameters you can “Try It Out”. This shows the URL called, and also the response body!
Trying out Swagger UI
That is it! How simple to test you RESTful API than by using YAML and Swagger UI.
You can now explore Swagger.IO and learn about the other languages that you can create connections into your EMS server with 🙂
Accessing the Address Book on iOS and Android is a common request for many developers building line of business applications; quickly followed by “and how do I dial a phone number from code“. In this post I will explore how to explore the mobile Address Book using a common code base that works on iOS and Android using TAddressBook. (list to samples and documentation at the bottom of this article)
The TAddressBook lives under Services section of the tool palette and consists of two and has very little in the way of Component properties. It does however have two events that are very useful, and a number of run time methods to call.
TAddressBook Component Events
The two events provide notification when the address book has been changed (outside the application) and the result of the application asking for access to the address book.
The Floating Form Designer is often commented as one of the reasons many developers still love using Delphi 7 after almost 14 years. In that time Delphi has moved on a long way, firstly moving to the Galileo (docked) IDE, added unicode, 64bit compiler, Generics, Attributes, RTTI (or reflection for .Net people), FireMonkey, cross platform compilers for Mac, iOS and Android, AppTethering, Visual LiveBindings, Refactoring and many more IDE features.
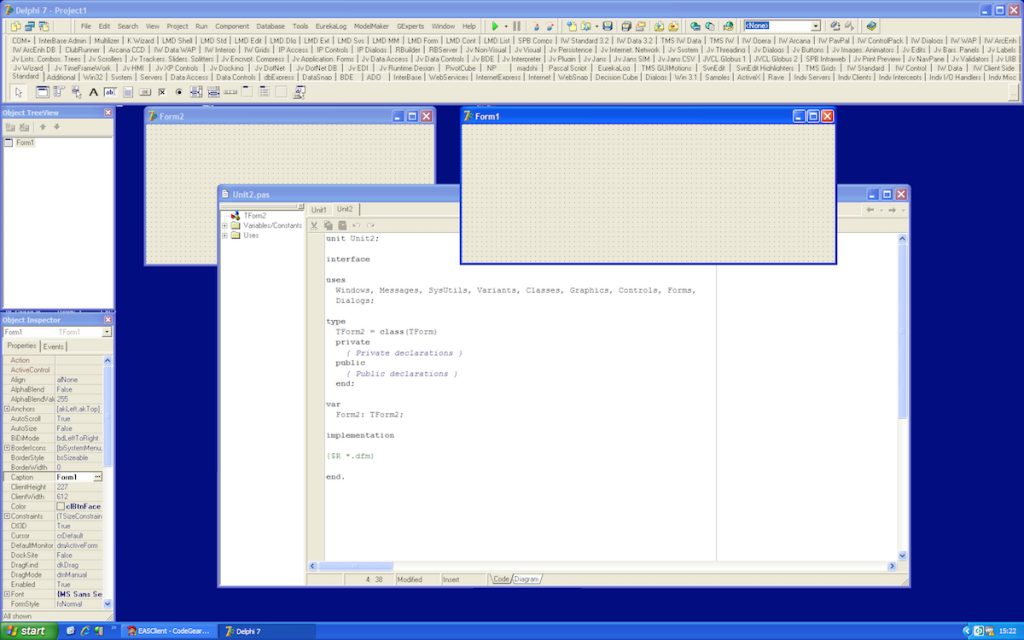
Floating Form Designer Delphi 7
However despite all the cool toys that have come in, a number of developers still love the floating form layout so much they have stuck with Delphi 7 rather than migrating up to newer versions for a number of legacy applications… if that is you… its finally time to get up to the latest version with the launch of 10.1 Berlin!
Enabling the Floating Form Designer
The IDE by default uses the embedded layout introduced with the Galileo IDE (as pictured below)
Galileo Embedded Form Designer
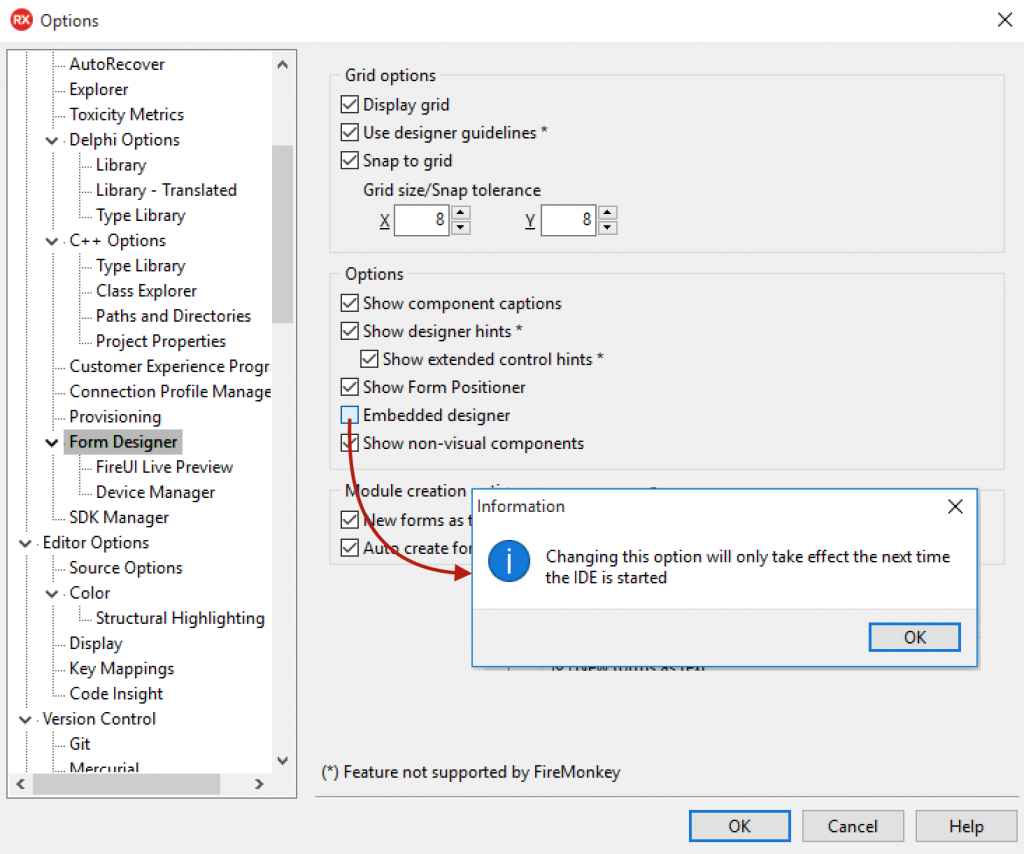
If you want to change to the old floating form designer, choose Tools > Options > Form Designer.
Embedded Designer – Option
Here you will get a notice that you need to restart the IDE, when you do, you then end up with the classic undocked mode, with the addition of the floating form designer.
Floating Form Designer with 2 forms open in 10.1 Berlin
With the release of RAD Studio 10 Berlin, it is now possible to modify the look of TListView Items, TListView Header and TListView footer using the Toggle DesignMode.
When you right-click your list view on the Form Designer and select the new Toggle DesignMode, you enable the visual list view item editor. Rather than having to manually adjust the position of each component that makes up the item layout, you can now visually modify the control.
TListView ItemAppearance set to DynamicAppearance, adding new items to the design
On your TListView item change the ItemAppearance property to DynamicAppearance, and then use the + to add in new objects.
Once added they appear under the Objects and can be renamed and modified manually as before or you can use the design mode to modify them.
Programming with Delphi & InterBase
This website uses cookies to improve your experience. We'll assume you're ok with this, but you can opt-out if you wish.AcceptRead More
Privacy & Cookies Policy
Privacy Overview
This website uses cookies to improve your experience while you navigate through the website. Out of these, the cookies that are categorized as necessary are stored on your browser as they are essential for the working of basic functionalities of the website. We also use third-party cookies that help us analyze and understand how you use this website. These cookies will be stored in your browser only with your consent. You also have the option to opt-out of these cookies. But opting out of some of these cookies may affect your browsing experience.
Necessary cookies are absolutely essential for the website to function properly. This category only includes cookies that ensures basic functionalities and security features of the website. These cookies do not store any personal information.
Any cookies that may not be particularly necessary for the website to function and is used specifically to collect user personal data via analytics, ads, other embedded contents are termed as non-necessary cookies. It is mandatory to procure user consent prior to running these cookies on your website.