Category Archives: Objective Pascal

Articles about programming with Objective Pascal in Delphi or Appmethod

Adding VCL Styles at runtime

VCL Styles

An example before & after

Screen Shot 2014-10-22 at 06.09.20VCL Styles at run time

VCL Styles provide a great way to update the look and feel of your VCL applications.  VCL Styles can be easily added into an application before you compile through  project options > appearance options.

Adding VCL Styles to Project : Options : Appearance
Adding VCL Styles via Project : Options : Appearance

While you can add VCL Styles into the application binary this way, they will increase the size of the application. If you want to avoid this, (or maybe run a mix of compiled in and dynamically loaded) you can distribute styles along side your application.

By default, VCL Styles are located at the following file path when installing your IDE.

C:\Users\Public\Documents\Embarcadero\Studio\15.0\Styles

A full overview of them is available on docwiki  http://docwiki.embarcadero.com/RADStudio/XE7/en/VCL_Styles_Overview

TStyleManager

Styles are managed via TStyleManager, a class located in unit VCL.Themes.

TStyleManager is a sealed class with a number of class methods that allow you to interact with the global application settings for the styles.

Some key properties on TStyleManager

  • TStyleManager.StyleNames – an array of the styles available in the application.
  • TStyleManager.SetStyle(StyleName : string) – the call to set the application style to a new style

Using these basic methods, its possible to implement code that loops the styles in the application and makes them available to a menu that can then be used at run time to choose which style is selected.

  • TStyleManager.IsValidStyle(FileName: string) – checks a file is a valid style
  • TStyleManager.LoadFromFile(FileName : string) – loads a style up from file.

With the additional file based calls its possible to check for style files and load those into your application as well.  – So lets do that!

VCL Styles code example

The MastApp demo that is installed by default with RAD Studio has an example of using TStyleManager. You can find the demo at:

C:\Users\Public\Documents\Embarcadero\Studio\15.0\Samples\Object Pascal\Database\IBX\IBMastApp

This demo uses 2 code parts and 1 design time selection element to provide styles in the demo.

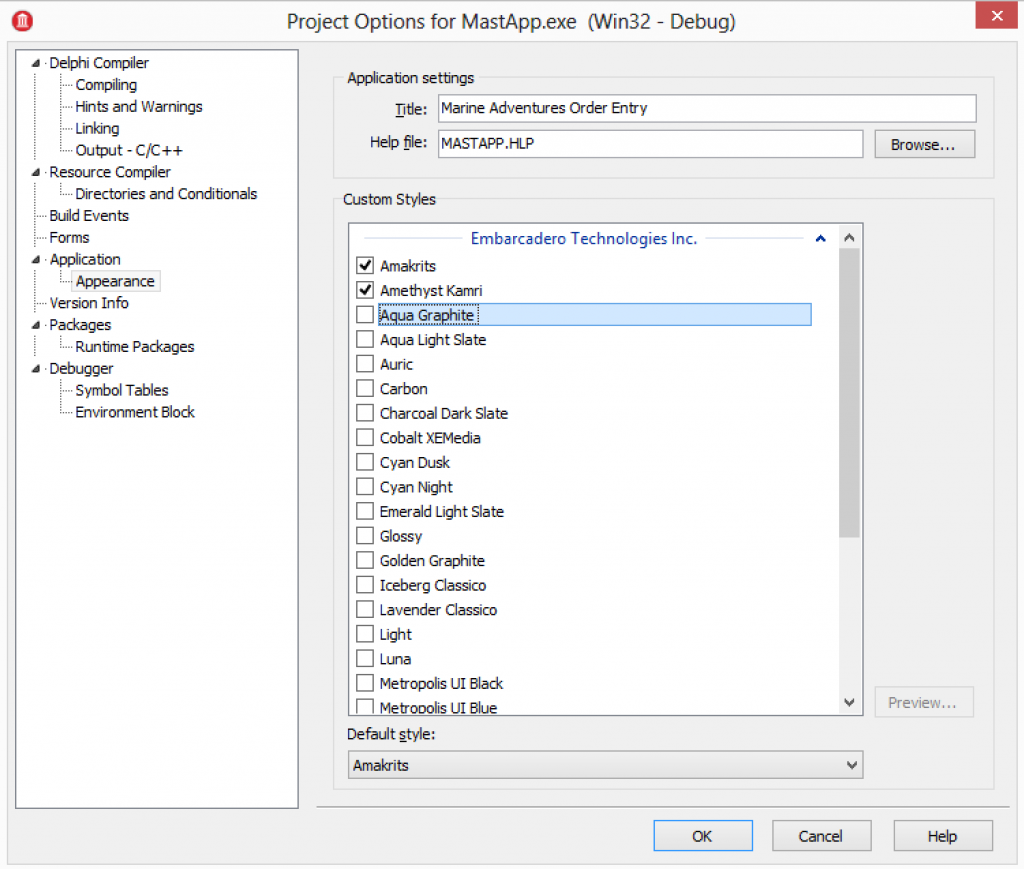
Part 1 – Compiling VCL Styles into your application.

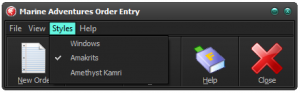
Open the project and then choose Project > Options and go to appearance. As above, select a couple of styles and run the application. You will then see the Styles menu is updated to show these styles.

The initial code to build the menu loops the StyleNames, creates a menu item for each style, adds then links to an OnClick event to change the style.

Part 2 – Building the style list menu

procedure TMainForm.FormCreate(Sender: TObject);
var
 Style: String;
 Item: TMenuItem;
begin
 //Add child menu items based on available styles.
 for Style in TStyleManager.StyleNames do
 begin
   Item := TMenuItem.Create(StyleMenu);
   Item.Caption := Style;
   Item.OnClick := StyleClick;
   if TStyleManager.ActiveStyle.Name = Style then
     Item.Checked := true;
   StyleMenu.Add(Item);
 end;
end;

Step 3 – OnClick event for the Style selected.

procedure TMainForm.StyleClick(Sender: TObject);
var
 StyleName: String;
 i: Integer;
begin
 //get style name
 StyleName :=   StringReplace(TMenuItem(Sender).Caption, '&', '',
 [rfReplaceAll, rfIgnoreCase]);
 //set active style
 TStyleManager.SetStyle(StyleName);
 //check the currently selected menu item
 (Sender as TMenuItem).Checked := true;
 //uncheck all other style menu items
 for I := 0 to StyleMenu.Count -1 do begin
   if not StyleMenu.Items[i].Equals(Sender) then
     StyleMenu.Items[i].Checked := false;
 end;

end;

So: We have styles working, but you can also load them from file with very little change to the application.

Loading Styles from file and displaying them in the list of styles

VCL Styles can be loaded at run time easily using TStyleManager.LoadFromFile

Using the existing demo, its possible to have it check for a styles sub folder and read any file in there to see if its a valid style.  To do this, we just need to use FindFirst, iterate the returned files and then if they are valid (something we can use TStyleManager.IsValidStyle to determine) load the files.

So the updated code looks something like this block below where we first build the path to check for VCL Style files; then check the folder exists, and if it does check each file to see if its a valid VCL Style (before loading it).  Secondly, using a TStringList the styles loaded are sorted and then the sorted list is used now to build a menu for selecting the styles.

procedure TMainForm.FormCreate(Sender: TObject);
var
 Style: String;
 Item: TMenuItem;
 i: integer;
 searchResults : TSearchRec;
 SearchDir: string;
 SLStyles: TStringList;
begin
 SearchDir := ExtractFilePath(ParamStr(0))  
                 +'styles'+ PathDelim;
 if DirectoryExists(SearchDir) then begin
   if FindFirst(SearchDir+'*.*',  
                faAnyFile - faDirectory,
                searchResults) = 0 then
   repeat
     try
       if TStyleManager.IsValidStyle(
            SearchDir+searchResults.Name) then
          TStyleManager.LoadFromFile(
             SearchDir+searchResults.Name);
     except
       // Who cares.. try the next one.
     end;
   until FindNext(searchResults) <> 0;
 end;
 // Sort the styles using a StringList 
 SLStyles := TStringList.Create;
 try
   SLStyles.Duplicates := TDuplicates.dupIgnore;
   for Style in TStyleManager.StyleNames do
     SLStyles.Add(Style);
   SLStyles.Sort;

   PMStyles.Items.Clear;
   // build menu from sorted list of styles
   for Style in SLStyles do begin
     Item := TMenuItem.Create(StyleMenu);   
     Item.Caption := Style; 
     Item.OnClick := StyleClick; 
     if TStyleManager.ActiveStyle.Name=Style then 
       Item.Checked := true; 
     StyleMenu.Add(Item);
   end;
 finally
   SLStyles.Free;
 end;
end;

Thats it! You can now create a sub folder for VCL styles that you ship along side your application or deploy at a later point.

For C++ use the same classes and units, just with the C++ Loops and constructs. more on VCL Styles with C++ can be found on docwiki


Mobile Development Lessons – Delphi & C++

Free series of mobile development lessons for Android and iOS based on C++ and Object Pascal.

Earlier in the year the 2nd edition of the mobile development summer school was run by David I and Jim McKeeth. It was great fun doing the first edition and its amazing to see how some of the tech has moved on further in the year since we first ran summer school. This years was more popular than ever and has been made available on YouTube

YouTube Playlist for video replays

https://www.youtube.com/playlist?list=PLwUPJvR9mZHhLj-gegxc0KpGE0wL2zVBo

Blogs for slides and samples:

To get started is easy!

Download your free trial of RAD Studio https://downloads.embarcadero.com/free/rad_studio

or your FREE edition of Appmethod (C++ Free for Android mobile)
http://www.appmethod.com 

Happy Coding!

Parallel Programming Thread Pool

In my Parallel Programming introduction post I explored how to easily get performance gains when running loop code by using the TParallel.For() loop construct. A key part of the Parallel Programming Library engine is the new ThreadPool that manages some of the complexity behind the scenes when using this syntax, but more on that later.

Following on from this first post I want to explore a common question I have heard. Is it possible to manage the Parallel Programming library thread pool Size? and if so how?

In short Yes, but I want to pose another question: Should you? – Lets explore this below.

Parallel programming thread pool

The Parallel programming thread pool is very smart! It automatically grows and shrinks based on CPU demand when your application runs and requires its use; it also throttles growth as your CPU usage rises ensuring it doesn’t over cook your CPU and ensuring you don’t lock up your machine. This inbuilt intelligence makes it very efficient and courteous out the box. All of this, without ANY management from us developers! 🙂 So why would you want to change this?

Thats not to say you can’t use a custom(ised) pool. If you do want to limit the size of a pool then you can override the defaults of  a TThreadPool.

TThreadPool Defaults

Defined in System.Threading, TThreadPool initiates with a default of 25 threads per CPU.

MaxThreadsPerCPU = 25;

TThreadPool multiplies the MaxThreadsPerCPU with the number of CPU’s on the machine (it gets this form calling TThread.ProcessorCount) and exposes the result via a read only property TThreadPool.MaxWorkerThreads.

To query the default pool size on your machine at runtime you can use TThreadPool’s handy class method that returns the default pool. With this pool you can then query the MaxWorkerThreads. e.g.

var
  i : integer;
begin
  i := TThreadPool.Default.MaxWorkerThreads;
  ShowMessage('Pool size = '+i.ToString());
end;

On my Windows VM running 2 cores I see 50, but on my Mac OS X with 8 cores, this code returns 200.

Customising a TThreadPool

Let me start this section by saying, modifying the default TThreadPool properties is not recommended. 

While possible, it is not recommended to modify the Default TThreadPool options as this is a global instance that is used throughout the application, and you never can be sure where and when its being used. You can however create your own instance of a TThreadPool that you modify and use and this is a better approach.

Creating and modifiying a TThreadPool

Creating a TThreadPool is as simple as declaring the variable and calling the constructor.

With an instance of a TThreadPool, you can then modify the MaxWorkerThreads by overriding the value using the method SetMaxWorkerThreads() which takes in an Integer. This sets it at a flat number regardless of the number of CPU’s you have available.  e.g. the following code reports 10 as the Max size on both my Windows and Mac OSX machines mentioned above.

var
  FPool : TThreadPool;

...

if Pool = nil then begin
  Pool := TThreadPool.Create;
  Pool.SetMaxWorkerThreads(10);
end;

Note, the MaxWorkerThreads number must always be greater than the MinimumWorkerThreads value that (by default) is set from TThread.ProcessorCount.

A word of caution..

Creating a new TThreadPool come with an overhead. From an initial test where I creating a new TThreadPool for running a small TParallel.For() loop, and then disposing it afterwards it actually decrease performance on your application compared to a traditional for loop. For this reason alone, I would always use a global TThreadPool. When the pool was created globally, the speed performance was immediately backup compared to the create and destroy on demand idea.

 Example of using a custom TThreadPool

Below is an example where Pool is a global TThreadPool.  When the button is selected to run a TThreadPool with a maximum of 10 WorkerThreads. The only adjustments from the example in the previous tutorials is that we now pass in Pool as a paramater to the For loop, note however that this is not being created and free’ed each time in this code.

var
  Pool: TThreadPool;

procedure TForm5.Button1Click(Sender: TObject);
var
 Tot: Integer;
 SW: TStopwatch;
begin
 // counts the prime numbers below a given value
 Tot := 0;
 SW := TStopWatch.Create;
 SW.Start;

 if Pool = nil then begin 
   Pool := TThreadPool.Create;
   Pool.SetMaxWorkerThreads(10);
 end;
 TParallel.For(1, Max, procedure (I: Integer)
   begin
     if IsPrime (I) then
       TInterlocked.Increment (Tot);
   end,Pool);
 SW.Stop;
 Memo1.Lines.Add (Format (
 'Parallel (Custom Pool) for loop: %d - %d', [SW.ElapsedMilliseconds, Tot]));
end;

I would say that while this gives me a sense of control, I actually don’t like the fact that I am messing with something that is highly tuned. I would personally conclude that a ThreadPool should be created as the application has initialised and that you use this. Ideally I would say use the default one, as it behaviour is very good already, but if you really want to make more work for yourself, then you can always set the properties of a new pool and use it.

 A thank you to Allen Bauer for his input while writing this post.

NFC in Android from Delphi / Objective Pascal

One great thing about developing with Embarcadero’s RAD Studio, Delphi, C++ Builder and AppMethod is the component development model. Developing with components allows you to write code once that works across all platforms as the components take care of the platform specific API mappings. e.g. Talking to the camera, accelerometer, compass etc.

There are however times when a component doesn’t exist (yet). This is normally when something is platform specific as it doesn’t make sense to have a component that is platform specific when you can still call the API’s of that platform. e.g. prior to the announcements from Apple on the iPhone 6, NFC was on Android but not iOS. 

So what do you need to do when you don’t have a component ready to go? – Well it depends on what you want to call. With regards to accessing NFC, then Brian Long and Danny Magin, both Embarcadero MVP’s, have recently blogged about working through importing the Java libraries required, setting up the intents to collect the message from NFC, setting your application so Android knows it can deal with messages from NFC and then using them. Pretty cool 🙂

If your interested further in calling platform API’s then check out the replays from the Skills Sprints for accessing Android and iOS API’s directly.

TTask.IFuture from the Parallel Programming Library

In my last post I spoke about TTask and how it enables us developers to quickly run multiple tasks at the same time with limited bottleneck in our applications. Moving on from that I want to explore IFuture which impletements ITask.

IFuture

IFuture , provides TTask with a structure us developers can use to creating a function that returns a specific type (defined using Generics, thats the <T> bit you see in code sometimes).  Using an instance of IFuture, the process can run and then allow us to get other stuff done, until such point as we need the result. This allows us to prioritise code blocks to run in the order we want them to, but still ensure we get the value we need at the point we need it!

Example

To get a value in the future, you first need to define what type of value, set it running and then go call it. To view this, below I am using a totally pointless (but shows how to use this feature) block of code, which I will break down step by step afterwards.

procedure TFormThreading.Button3Click(Sender: TObject);
var
 OneValue: IFuture <Integer>;
 OtherValue: Integer;
 Total: Integer;
begin
 OneValue := TTask.Future<Integer>(function: Integer
   begin
     Result := ComputeSomething;
     Sleep(1000); // delay to show status
   end);

 Memo1.Lines.Add(TRttiEnumerationType.
 GetName<TTaskStatus>(OneValue.Status));

 OtherValue := ComputeSomething;

 Memo1.Lines.Add(TRttiEnumerationType.
 GetName<TTaskStatus>(OneValue.Status));

 Total := OtherValue + OneValue.Value;

 Memo1.Lines.Add(TRttiEnumerationType.
 GetName<TTaskStatus>(OneValue.Status));

 // result
 Memo1.Lines.Add(Total.ToString);
end;

The output of this code looks something like this..

IFutures

Key points in the code

The first step, is using TTask.Future<T> to define the type to be returned, and then pass in the anonymous method to return the instance of that value. (Here we are getting an Integer from ComputeSomething so we use Integer as the type)

The output of calling TTask.Future is an instance of IFuture into the OneValue variable defined.

 OneValue := TTask.Future<Integer>(function: Integer
   begin
     Result := ComputeSomething;
     Sleep(1000); // delay to show status
   end);

OK, so putting a Sleep command in the anonymous method here is kind of pointless, but it does allow when running this demo code to see the result of the call to OneValue.Status change from WaitingToRun, to Running, to Completed.

As you read down further, you will see OneValue being queried for its current status. The code for converting our Future’s Status to a string is the same as any other Enumeration type, pass in the type you want to convert and the value to GetName.

TRttiEnumerationType.
 GetName<TTaskStatus>(OneValue.Status)

The first value returned will be WaitingToRun as everything is prepared. Following the first status query, we call the same ComputeSomething task

 OtherValue := ComputeSomething;

Afterwards, we can check the status of OneValue and see that (due to the sleep taking longer than the ComputeSomething call) its now reporting as running.

So hold on! Does that mean we need to check the status to see if its OK to get the value? Well actually NO 🙂

 Total := OtherValue + OneValue.Value;

This line asks OneValue for its Value. If it is done, it will have the value ready for you, if not (as in this case) it will block and wait for IFuture to finish before executing the code making life very easy on us developers.

So thats IFuture, its a process that you can set running, but will return at the point it is ready. Another way to save time and speed up your application code.

Using TTask from the Parallel programming library

In my last post on using Parallel Programming and the TParallel.For construct we learned about the new System.Threading unit and how to use TParallel to make looping faster.  There are however times when you need to run multiple tasks that are not loops, but these can run in parallel.

Running a number of processes in tandem has been greatly simplified with System.Threading.TTask and System.Threading.ITask

TTask provides a class to create & manage interaction with instances of ITask. You can choose to WaitForAll or WaitForAny to finish before proceeding in code.

To give an example. Imagine you have two tasks. A and B.
If A takes 3 seconds and B takes 5 seconds how long does it take to get a result to a user?

  • Sequentially (without TTask / ITask) = 8 seconds.
  • Using TTask.WaitForAll = 5 seconds
  • Using TTask.WaitForAny = 3 seconds

Depending on what your doing, the speed for return can be dramatically quicker. So lets look at a code example for WaitForAll.

procedure TFormThreading.MyButtonClick(Sender: TObject);
var
 tasks: array of ITask;
 value: Integer;
begin
 Setlength (tasks ,2);
 value := 0;

 tasks[0] := TTask.Create (procedure ()
   begin
     sleep (3000); // 3 seconds
     TInterlocked.Add (value, 3000);
   end);
 tasks[0].Start;

 tasks[1] := TTask.Create (procedure ()
   begin
     sleep (5000); // 5 seconds
     TInterlocked.Add (value, 5000);
   end);
 tasks[1].Start;

 TTask.WaitForAll(tasks);
 ShowMessage ('All done: ' + value.ToString);
end

The above example uses an Array of ITask to process a set of tasks. The result returned is 8000, but despite 8 seconds worth of sleep commands, the first 3 seconds run in parallel, leaving the second task to finish before returning 2 seconds later, which equates to a 3 second gain on sequentially running the two tasks; and all of this without having to create your own custom threads and managing them return. 🙂

While speeding up a task to run before returning is good, you can also use TTask to prevent the user interface locking up if you want to start something in the background.  To do this, you can just run a single task and start it, for example

procedure TFormThreading.Button1Click(Sender: TObject);
var
 aTask: ITask;
begin
 // not a thread safe snippet
 aTask := TTask.Create (procedure ()
   begin
     sleep (3000); // 3 seconds
     ShowMessage ('Hello');
   end);
 aTask.Start;
end;

This second example, if used, would allow the user to press the button multiple times resulting in multiple ShowMessage calls, however, used with care this is a powerful way to run task. This is also an example of asynchronous programming where you can start the Task, get on with other stuff, and then deal with the result as it returns.

ITask

ITasks provide a range of methods and properties to Start, Wait, Cancel and also a property for Status (Created, WaitingToRun, Running, Completed, WaitingForChildren, Canceled, Exception)

As ITask is an interface, you can always create your own classes that use ITask if you so wish, providing great flexibility to the frame work.

Parallel Programming with Delphi XE7; a quick introduction

Everyone knows that typically device / computers today have multiple CPU’s, even my phone has 4! But when it comes to programming to get full benefits of working across those cores its often been a little tricky or time consuming and extra code overhead to manage.  Well… that is until now with Parallel Programming with Delphi!

Starting with Delphi, C++ Builder and RAD Studio XE7, there is a new library that simplifies the effort needed to get tasks running in parallel, aptly named the Parallel Programming Library.

The Parallel Programming Library lives within the System.Threading unit and is made up of a number of new helpful features that can be easily introduced into new and also existing projects. There are also loads of overloaded arguments for fine tuning and supporting C++ working with this as well as Object Pascal.

These features include a new Parallel for loop that is easy to uses, along side a number of more advanced features for running tasks, joining tasks, waiting on groups of tasks etc to process. Under the hood there is a thread pool that self tunes itself automatically (based on the load on the CPU’s).

To give you an idea about how easily this is to plug in, lets take a simple example where you want to work out if a number is a prime number.

function IsPrime (N: Integer): Boolean;
var
 Test: Integer;
begin
 IsPrime := True;
 for Test := 2 to N - 1 do
   if (N mod Test) = 0 then
   begin
     IsPrime := False;
     break; {jump out of the for loop}
   end;
end;

The traditional way to loop  and check for the number of prime numbers between 1 to X value would be to do something like this where each number is checked in sequence and the total stored into a variable (here Tot is an integer)

const
 Max = 50000; // 50K

for I := 1 to Max do
 begin
   if IsPrime (I) then
     Inc (Tot);
 end;

Using the new Parallel library, this can be achieved by replaces the “for” command with a call to the class function TParallel.For passing in the code to be run as an anonymous method.

In addition, to avoid clashes with multiple threads running, you can call TInterlocked.Increment.

TParallel.For(1, Max, procedure (I: Integer)
 begin
   if IsPrime (I) then
     TInterlocked.Increment (Tot);
 end);

So what difference does this make?

Using TStopWatch from System.Diagnostics we are able to test the time to run each version of the loop above. Even on my VM running only 2 cores the time drops from 415ms for the standard for loop down to 192ms using the Parallel programming library version. On my Mac where there are more cores available it goes from 382ms down to 90ms for the same test!

What I love about this, is this is a really easy solution to plug into existing code as its part of the language and framework.

The great thing about writing native code is that we can take advantage of all the cores on a device. 🙂 Including Mobiles! However, as a word of caution, use it only where you need to on mobile as it will use more battery if you are running multiple threads heavily.

Samples

An other example that can help get your head around how to use the Parallel Programming library is a sample of Conways game of life for both Object Pascal and C++ in the samples directory shipped with XE7, located in the RTL samples. e.g.

C:\Users\Public\Documents\Embarcadero\Studio\15.0\Samples\Object Pascal\RTL\Parallel Library
C:\Users\Public\Documents\Embarcadero\Studio\15.0\Samples\CPP\RTL\Parallel Library

Not sure about you, but I’m off to speed up some processing in some old projects I have 🙂 Happy coding!

Calling JNI and Java API’s with Delphi and Appmethod

Following on from the iOS specific session that spoke about iOS and talking to Objective C API’s, Jim McKeeth has done a session on Java and the JNI (Java Native Interface) bridge to the Java API’s.

He speaks about conditional defines and how to use JNI to speak to a custom set of Java Libraries. While mainly in Object Pascal, the same technique is used to access via C++ and demos are done in both language.

The video covers the creation of class methods and regular methods that are then used with the TJavaGenericImport class to bring them all together ready for importing. (A walk through is also provided on DocWiki)

http://docwiki.embarcadero.com/RADStudio/XE6/en/Using_a_Custom_Set_of_Java_Libraries_In_Your_RAD_Studio_Android_Apps

The example in the video covers a string being Base64 encoded using a JNI call. For the steps to create the custom classes.dex file  you can also see Jim’s blog post at http://delphi.org/2014/07/custom-classes-dex/