All posts by Stephen Ball

Stephen is a Charted IT Professional and the Associate Product Manager for InterBase at Embarcadero. He is also a Product Evangelist for RAD Studio, regularly speaking across EMEA. @DelphiABall

Debugging to PA Server on Windows

PA Server – What and why?

When developing software for multiple platforms you often need to debug and run applications on machine and devices that are not your development PC. The RAD Studio and Appmethod approach to this is an ingenious little program that acts as a go-between from the IDE to the remote device / machine. Called PAServer (PA = Platform Assistant) allows the IDE to retrieve the full call stack at run time, pause code with break points, inspect values etc, exactly as you would do debugging a local application.

PA Server is often used on a Mac OS X target for running and debugging applications to Mac OS X, iOS Simulator and iOS Devices, however there is also a windows version of PAServer and this can also be used to simplify preparing for deployment.

PA Server runs over TCP/IP and while developers often use it for local network work, in theory there is no reason why you can not use it to remote debug that trouble some customer where you can’t quite recreate what they are doing. (as long as they are happy for you to install the PA Server client on their machine).

PA Server is also great for deploying files directly to a remote machine when used with the Deployment Options for the project. This ensures that all the files specified are pushed remotely. This is great for updating a remote server or internal build machines.

Installation of PAServer

PA Server needs to be installed on the machine you want to run applications on remotely The install files both Windows and Mac OS X are located in the PAServer folder under your Appmethod / RAD Studio / Delphi / C++ Builder installation. e.g. with RAD Studio XE7 they are located at C:\Program Files (x86)\Embarcadero\Studio\15.0\PAServer.

Both installers (Windows / Mac OS X) just require you to push the next button a few times to install the server.

Running PA Server remotely…

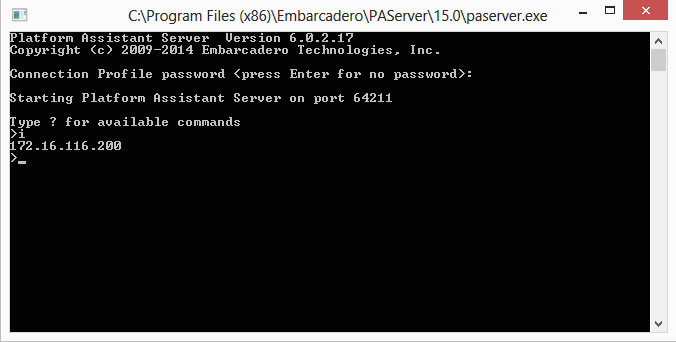
PA Server is ultimately a Console application that you launch, enter a session password (that remote developers will need to connect to the session) and leave running without having to go back to it, but this is how to launch it on each platform.

..on MAC OS X

To launch PAServer on a Mac you have two choices.

  1. Go to “Applications” and choose PAServer 15.0 (for XE7)
  2. Use the new GUI in LaunchPad called PAServer Manager PAServer Manager Icon

If you use PAServer Manager you will see the icon appear at the top of your screen in the menu bar. Clicking on this allows you to “Add Server” (I just call it MyMac by default) and then start and stop the services as well as other useful things like viewing the information (such as IP Address etc).  A lot easier than remembering command codes.

PA Server Manager

PA Server Manager is also useful for managing groups of developers who want to run multiple instances of PA Server on the same machine when developing.

..On Windows

To launch PA Server on windows once installed, you need to browse to the PAServer folder (typically C:\Program Files (x86)\Embarcadero\PAServer\15.0) and double click on the PAServer application.

PAServer on Windows Running
PAServer running on Windows

 Connecting to PAServer running on a Windows machine from the IDE

With PA Server installed, opened and a password set for the session, it is possible to make the remote connection (or even a loopback for a more advanced local test). To achieve this we need to configure a profile for connecting to the remote PAServer instance. – this is really quick to do.

Firstly select the desired compilation target of Win32 or Win64  in the Project Manager, and then right click and choose properties.  The platform properties window is then opened allowing you to choose a profile for the target.

Platform Properties

By default you will need to choose “Add New…” under platforms the first time you run this step, subsequently you will already have the profile saved.


Following the wizard for Add New, you can enter a name (e.g. MyPC) and then the IP address (port 64211 should be default unless you have changed it during install). Once you have the IPAddress or pc name entered you can “Test Connection” to verify that the path is working correctly.

Platform Properties Wizard 2

If this fails then check you IP Address is correct – if unsure type “i” into the PAServer console and hit enter to get a list of the listening IPAddresses and check your firewall.

Once you have selected the Platform Profile and its tested, all you need to do is hit run just like before.  Rather than deploying to your project directory, deploying to PA Server sends out all the files into a the PAServer scratch directory (under Documents\PAServer) e.g. C:\Users\Steve\Documents\PAServer\15.0\scratch-dir\

Tip for making things simple?

If you have selected any feature files or added your own files under Deployment Options when developing your applications, e.g. enabling InterBase, IBLite or DBExpress etc. These files will be packaged up for you when running out to PAServer giving you a complete folder structure with files ready for packaging. This also makes testing locally a lot lot simpler 🙂

Getting back to normal

Once you are done testing against a remote profile you can easily return to running locally by right clicking on the target and choosing to Revert to Default Connection.

Revert to default connection

RAD Studio XE7 – includes IBLite for all platforms!

RAD Studio XE7 has been launched this week and brings with it a host of new features and new components for both the VCL and FMX frameworks.

Its nice to see a lot of care has been made with the new language and non visual components to ensure lots of new stuff for both VCL and FireMonkey which is great for older legacy products and also newer mobile ones. This includes access to Bluetooth (that also now works with AppTethering), a new middle tear architecture called EMS (Enterprise Mobility Services) and the ability to plug in a very fast parallel programming library. The full “whats new” list is on DocWiki and I would recommend a read of that before you go any further – There are some real gems in there. (did I mention GitHub support in the IDE as well?)

On the component side, Marco Cantu has done a great summary post already http://blog.marcocantu.com/blog/2014_september_Delphixe7_newclasses.html  so I feel free to mention a very exciting edition to the run time royalty free side 🙂

IBLite for all platforms – Runtime royalty free!

RAD Studio XE5 saw IBLite appear, a free version of InterBase (in its embedded format) for iOS, with RAD Studio XE6 Android was added and now with RAD Studio XE7 InterBase IBLite is available on Windows and Mac OS X as well.

I will follow up with some blog posts about using this soon, but there is also now a new “Lite” property on the TFDPhysIBDriverLink. Setting this to true picks up the fact you are using IBLite and will default the drivers to the correct locations for the embedded version.

As IBLite can be used as a client library, for those using InterBase, this also opens up the door to free local storage and client driver in one, to simplify the install process. This can also mean fewer access rights as you don’t have to install the client on a machine if you use IBLite.

As before you do need to generate your InterBase license file and deploy that with your application. The license is supplied in your order fulfilment email. (You can see the steps to take in this video)

InterBase IBLite is a great path for those who want the same easy to use database on all platforms, with the support to scale into the future with the full version. It also is a great path for those moving up from Paradox, especially when you look at using FireDAC and reFind to migrate

More InterBase Quick start videos http://www.embarcadero.com/products/interbase-labs

More on InterBase
http://www.embarcadero.com/products/interbase

Calling JNI and Java API’s with Delphi and Appmethod

Following on from the iOS specific session that spoke about iOS and talking to Objective C API’s, Jim McKeeth has done a session on Java and the JNI (Java Native Interface) bridge to the Java API’s.

He speaks about conditional defines and how to use JNI to speak to a custom set of Java Libraries. While mainly in Object Pascal, the same technique is used to access via C++ and demos are done in both language.

The video covers the creation of class methods and regular methods that are then used with the TJavaGenericImport class to bring them all together ready for importing. (A walk through is also provided on DocWiki)

http://docwiki.embarcadero.com/RADStudio/XE6/en/Using_a_Custom_Set_of_Java_Libraries_In_Your_RAD_Studio_Android_Apps

The example in the video covers a string being Base64 encoded using a JNI call. For the steps to create the custom classes.dex file  you can also see Jim’s blog post at http://delphi.org/2014/07/custom-classes-dex/

Summer School 2014 – Android and iOS development training

Last year I had the pleasure of hosting the majority of the mobile development training series “Developer Direct – Summer School“.  It was great fun covering everything from Application UI design to local storage through to remote data collection.

The last year has seem some major enhancements to RAD Studio and Appmethod with new components making some of this easier and more exciting with new possibilities, so the content has been updated and re-run by David I and Jim McKeeth in both C++ and Object Pascal/Delphi programming lessons.

SummerSchool2014

To watch the 6 iOS and Android native development lessons register for free at http://forms.embarcadero.com/RADSummerSchool2014

Checking your Android device is ready for development

In this blog I want to take you through the steps for getting your Android device working with the standard USB device drivers, including steps to follow to check if what you have done has worked.

Jim McKeeth did a blog post a while back about installing custom specified Android devices that is worth reading if your device does not work with the standard drivers, however I would recommend trying this first.

Developer mode Enabled?

When you plug in your Android device, you will need to ensure you have  enabled developer mode and confirmed that you want to enable USB Debugging. Under “Setting”, you should be able to see

{ } Developer options

as a menu item. If you don’t, tap “About phone” menu item 5 times to start the messages about going into developer mode.

It is also worth checking at this point that “USB Debugging” is enabled under developer options. You will still need to confirm on the phone when you finally have it all setup and you plug the phone in for the first time, but this is the first steps.

Phone drivers installed?

On windows, you need to have the drivers installed for the phone to enable it for developer work. Once you plug the device in, check the device manager. If it shows under Other Devices with a yellow alert, then you will need to update the drivers.

Nexus 4 showing in Device Manger when its not installed correctly

You can download the drivers if you search the web for them and point to those, or you can download and install them easily with the Android SDK Manager.

Launching the Android SDK Manager

To launch the Android SDK Manager, first open a command prompt and navigate to the android SDK tools folder. With Appmethod / RAD Studio they will be installed by default in the public documents. You can reach them using the cd command. e.g.

cd \Users\Public\Documents\Embarcadero\Studio\14.0\PlatformSDKs\adt-bundle-windows-x86-20131030\sdk\tools

From the SDK tools folder type in Android and hit enter and the SDK manager will open.

Installing the USB Drivers

With the Android SDK Manager launched you can now see the packages installed / to update. Specifically we are looking for the Google USB Driver. (see image below) Once found, choose “Install xx packages” button at the bottom of the screen.

Android SDK Manager, USB Drivers ready to update

Note: If you don’t see it, then install any packages that are pending update, close and re-open. It should then connect back to the Internet and refresh the list and make the Google USB Driver visible ready to install.

Updating the device driver

Once you have the drivers on your machine, the next step is to update the driver back in the device manager.

Update Driver in Device Manager

Choose to browse the computer and go back to the PlatformSDKs folder (path above) and choose to search sub folders.

Set path to find Android SDK for Appmethod / RAD Studio

If you have not already said to “always trust” google inc. You should see immediately be asked to confirm installing the driver.

Confirm Install
Confirm Install

Once installed the Android Composite ADB Interface driver will be installed and you will get confirmation.

Confirmed, Driver Installed

At this point, you should be able to see in the device manager the device is installed.

Android Device Installed

With the phone drivers installed, it is now time to check the ADB command line can see your device. If it can, then you are ready to use it for development.

Checking ADB can see your Android device

To check that ADB can see your device, its time to head back to the command line and run the ADB application.  ADB.exe lives in the ..sdk\platform-tools folder. From the command line you should be able to get there with something like…

cd \Users\Public\Documents\Embarcadero\Studio\14.0\PlatformSDKs\adt-bundle-windows-x86-20131030\sdk\platform-tools

Once your command prompt window is open at Platform Tools, run the following command to view the connected devices.

adb devices

The following screen below shows the output. Here I have my android device connected, but as yet I have not confirmed the connection on my phone as being allowed This causes the device to show as unauthorized.

Un-authroised Device

If the android device shows as unauthorized then unlock the phone and choose to Allow USB debugging.

Approving Debugging for Android

Once the device is approved, you should be able to re-run the ADB devices command and see the device id nows shows the status of “device”

ADB for approved device

At this point you are ready to use your android device for development! Refresh your Android devices in your IDE (right click on Android as a Target platform in the Project Manager and it will become visible.

Screen Shot 2014-07-30 at 17.13.58

Returning specific rows of data with InterBase

Ever wanted to select specific rows from a dataset? Well InterBase has some very cool features in the SQL syntax  that allows you to do just that!

Paging Data

Adding the ROWS command to the end of your SQL statement (as per the example below) will return a specific number of records. For examples, to fetch the first 10 records just add rows 10.

Select * from MyTable
rows 10;

When you want to get the next 10 records you can use the extended syntax with the “to” command.

Select * from MyTable
rows 11 to 20;

The second query can obviously be used to fetch records 1 to 10 as well and is very useful when combined with a parameterised query to allow restful paging of data sets.

Fetching Page Headers

Now, say you wanted to get the first record of every page of data, you can also easily do this by adding an additional optional parameter “by” for example

Select * from MyTable
rows 1 to 100 by 10;

The above statement would return records 1, 11, 21, 31 etc… for the total records up to 100th record.

You can also skip records to return by a percentage of the dataset result size by simply adding “PERCENT” to the end of the above statement.

Select * from MyTable
rows 1 to 100 by 7 PERCENT;

Getting the top 10

But what if you want to use ROWS to get the top 10? Well, you can easily select 10 records, but what if the 11th and 12th record have the same value as the 10th? They should be returned as well, but how?

InterBase supports this easily by adding “WITH TIES”. To use “WITH TIES” you also need to include an “ORDER BY” clause to indicate what field to measure the ties on.  For example, to get the top 10 sales people by a field storing the sales_booked, you could run the following statement.

Select * from salespeople
order by sales_booked desc
rows 10 with ties;

This will include the top 10 and also anyone with sales_booked matching the 10th record.

Getting the first 10 percent

Following on, the first 10% of records can be returned by using the following syntax.

Select * from salespeople
rows 10 percent;

While getting 10% of records is a nice feature, combining this with the “ORDER BY” and “WITH TIES” makes a very easy way to select the top 10% of sales people (for example) rather than the top 10.

Summary

There are some very cool features in the InterBase language for defining the specific size and scope of data to return that lend itself nicely to a range of useful implementations around statistics and restful data service development.

For more fun details on the InterBase language, check out the language reference guide on http://docs.embarcadero.com/products/interbase

Speeding up SQL processing with Array DML

If you want to really make your application scream, then one key area to get your interaction right is with the database layer. The example below becomes 8 (eight) times faster processing 10,000 records!

A number of high end databases (including Oracle and InterBase) include support for array inserts which, in short, is a much faster way to insert data. Rather than having to process record after record, the process accepts a block of changes that are processed in one hit. To be clear, this is not the same as starting and ending a database transaction, (something else that can also really help with speed).

Array DML in FireDAC helps you take advantage of database engines that support this feature easily. To see the difference in code and speed, lets explore a simple example. The example uses the following table called test containing two fields, Integer and string

CREATE TABLE test(Field1 INTEGER, field2 VARCHAR(20))

The typical way to insert 10000 records is to use a loop, where we have a query that just updates the parameters and executes the SQL.

const
  NUM_INSERTS = 10000;

procedure TForm7.Button1Click(Sender: TObject);
var i: integer; t: integer;
begin
  FDQuery1.ExecSQL('DELETE FROM test');
  FDQuery1.SQL.Text := 'INSERT INTO test(field1, field2) values (:field1, :field2)';
  t := GetTickCount;
  FDQuery1.Connection.StartTransaction;
  try
    for i := 0 to NUM_INSERTS-1 do
    begin
      FDQuery1.Params[0].AsInteger := i;
      FDQuery1.Params[1].AsString := 'Str' + IntToStr(i);
      FDQuery1.ExecSQL;
    end;
  finally
    FDQuery1.Connection.Commit;
  end;
  (Sender as TButton).Caption :=  FloatToStr((GetTickCount() - t) / 1000);
end;

To alter this code to use Array DML, there is very little to do. Firstly, before setting the parameter values you can set the size of the array you want to insert. (You can always set this higher that needed if your not sure)

Once the array size is set, there is a small modification to the way the parameter values are set. FireDAC supports the plural setters for setting each record in the dynamic array. (see code below)

Finally, there execute command is changed to tell it to run for the total records you want to insert.

procedure TForm7.Button2Click(Sender: TObject);
var i: integer; t: integer;
begin
  FDQuery1.ExecSQL('DELETE FROM test');
  FDQuery1.SQL.Text := 'INSERT INTO test(field1, field2) values (:field1, :field2)';
  t := GetTickCount;
  FDQuery1.Connection.StartTransaction;
  try
    FDQuery1.Params.ArraySize := NUM_INSERTS;
    for i := 0 to NUM_INSERTS-1 do
    begin
      FDQuery1.Params[0].AsIntegers[i] := i;
      FDQuery1.Params[1].AsStrings[i] := 'Str' + IntToStr(i);
    end;
    FDQuery1.Execute(NUM_INSERTS,0);
  finally
    FDQuery1.Connection.Commit;
  end;
  (Sender as TButton).Caption :=  FloatToStr((GetTickCount() - t) / 1000);
end;

So what is the difference at run time? On my PC (virtual machine), running the 10,000 inserts takes 1.014 seconds in the first block of code, compared with 0.125 seconds with the second block of code. i.e. only 12% of the original processing time and over 8 times faster!

Thats about it! The code for the above Array DML FireDAC demo is available at code central http://cc.embarcadero.com/item/29832

An video example of this in action, along with a number of other FireDAC capabilities is also available in the FireDAC Session from Developer Direct Season 4 video.