In this blog I want to take you through the steps for getting your Android device working with the standard USB device drivers, including steps to follow to check if what you have done has worked.
Jim McKeeth did a blog post a while back about installing custom specified Android devices that is worth reading if your device does not work with the standard drivers, however I would recommend trying this first.
Developer mode Enabled?
When you plug in your Android device, you will need to ensure you have enabled developer mode and confirmed that you want to enable USB Debugging. Under “Setting”, you should be able to see
{ } Developer options
as a menu item. If you don’t, tap “About phone” menu item 5 times to start the messages about going into developer mode.
It is also worth checking at this point that “USB Debugging” is enabled under developer options. You will still need to confirm on the phone when you finally have it all setup and you plug the phone in for the first time, but this is the first steps.
Phone drivers installed?
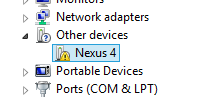
On windows, you need to have the drivers installed for the phone to enable it for developer work. Once you plug the device in, check the device manager. If it shows under Other Devices with a yellow alert, then you will need to update the drivers.
You can download the drivers if you search the web for them and point to those, or you can download and install them easily with the Android SDK Manager.
Launching the Android SDK Manager
To launch the Android SDK Manager, first open a command prompt and navigate to the android SDK tools folder. With Appmethod / RAD Studio they will be installed by default in the public documents. You can reach them using the cd command. e.g.
cd \Users\Public\Documents\Embarcadero\Studio\14.0\PlatformSDKs\adt-bundle-windows-x86-20131030\sdk\tools
From the SDK tools folder type in Android and hit enter and the SDK manager will open.
Installing the USB Drivers
With the Android SDK Manager launched you can now see the packages installed / to update. Specifically we are looking for the Google USB Driver. (see image below) Once found, choose “Install xx packages” button at the bottom of the screen.
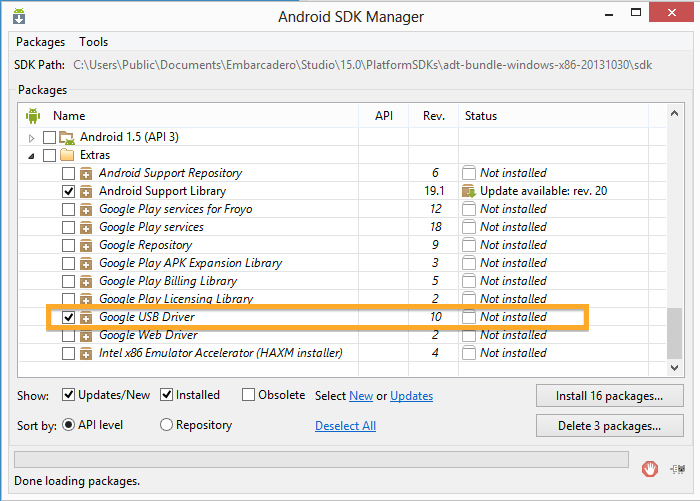
Note: If you don’t see it, then install any packages that are pending update, close and re-open. It should then connect back to the Internet and refresh the list and make the Google USB Driver visible ready to install.
Updating the device driver
Once you have the drivers on your machine, the next step is to update the driver back in the device manager.

Choose to browse the computer and go back to the PlatformSDKs folder (path above) and choose to search sub folders.

If you have not already said to “always trust” google inc. You should see immediately be asked to confirm installing the driver.

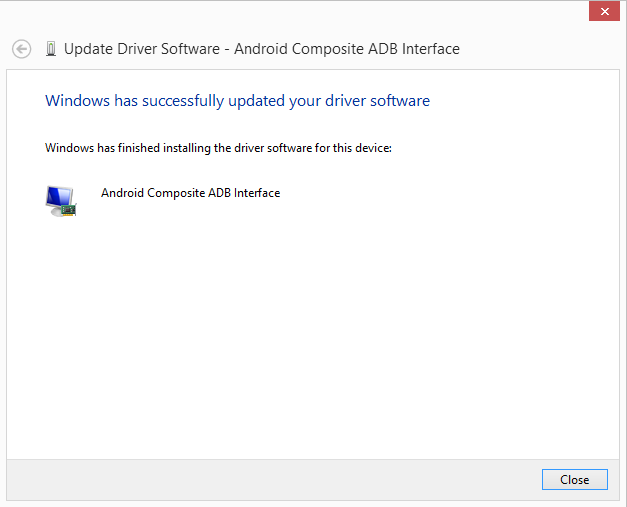
Once installed the Android Composite ADB Interface driver will be installed and you will get confirmation.
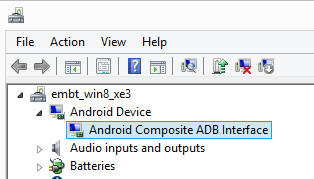
At this point, you should be able to see in the device manager the device is installed.
With the phone drivers installed, it is now time to check the ADB command line can see your device. If it can, then you are ready to use it for development.
Checking ADB can see your Android device
To check that ADB can see your device, its time to head back to the command line and run the ADB application. ADB.exe lives in the ..sdk\platform-tools folder. From the command line you should be able to get there with something like…
cd \Users\Public\Documents\Embarcadero\Studio\14.0\PlatformSDKs\adt-bundle-windows-x86-20131030\sdk\platform-tools
Once your command prompt window is open at Platform Tools, run the following command to view the connected devices.
adb devices
The following screen below shows the output. Here I have my android device connected, but as yet I have not confirmed the connection on my phone as being allowed This causes the device to show as unauthorized.
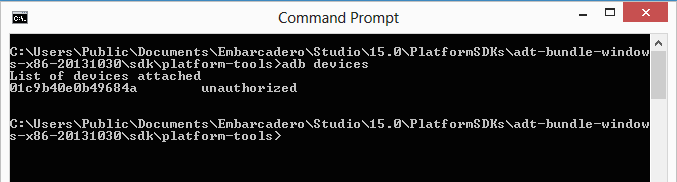
If the android device shows as unauthorized then unlock the phone and choose to Allow USB debugging.

Once the device is approved, you should be able to re-run the ADB devices command and see the device id nows shows the status of “device”

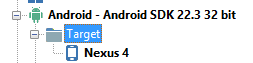
At this point you are ready to use your android device for development! Refresh your Android devices in your IDE (right click on Android as a Target platform in the Project Manager and it will become visible.
3 thoughts on “Checking your Android device is ready for development”