One long term features of the Delphi / C++ Builder / RAD Studio and Appmethod IDE’s is the data explorer, however did you know it has had a great facelift recently to make it even easier to use and much more practical to work with?
Join me in this Skill Sprint video as I look in depth at the updates and changes to the data explorer and how its really come of age.
Last year I had the pleasure of hosting the majority of the mobile development training series “Developer Direct – Summer School“. It was great fun covering everything from Application UI design to local storage through to remote data collection.
In this blog I want to take you through the steps for getting your Android device working with the standard USB device drivers, including steps to follow to check if what you have done has worked.
Jim McKeeth did a blog post a while back about installing custom specified Android devices that is worth reading if your device does not work with the standard drivers, however I would recommend trying this first.
Developer mode Enabled?
When you plug in your Android device, you will need to ensure you have enabled developer mode and confirmed that you want to enable USB Debugging. Under “Setting”, you should be able to see
{ } Developer options
as a menu item. If you don’t, tap “About phone” menu item 5 times to start the messages about going into developer mode.
It is also worth checking at this point that “USB Debugging” is enabled under developer options. You will still need to confirm on the phone when you finally have it all setup and you plug the phone in for the first time, but this is the first steps.
Phone drivers installed?
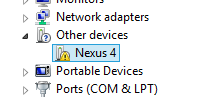
On windows, you need to have the drivers installed for the phone to enable it for developer work. Once you plug the device in, check the device manager. If it shows under Other Devices with a yellow alert, then you will need to update the drivers.
Nexus 4 showing in Device Manger when its not installed correctly
You can download the drivers if you search the web for them and point to those, or you can download and install them easily with the Android SDK Manager.
Launching the Android SDK Manager
To launch the Android SDK Manager, first open a command prompt and navigate to the android SDK tools folder. With Appmethod / RAD Studio they will be installed by default in the public documents. You can reach them using the cd command. e.g.
cd \Users\Public\Documents\Embarcadero\Studio\14.0\PlatformSDKs\adt-bundle-windows-x86-20131030\sdk\tools
From the SDK tools folder type in Android and hit enter and the SDK manager will open.
Installing the USB Drivers
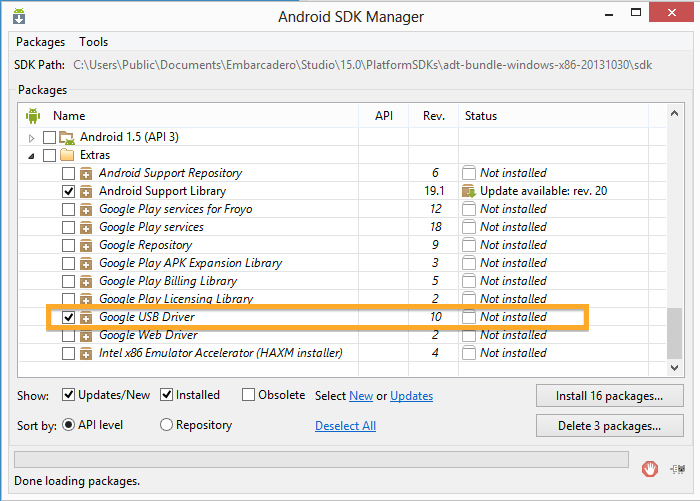
With the Android SDK Manager launched you can now see the packages installed / to update. Specifically we are looking for the Google USB Driver. (see image below) Once found, choose “Install xx packages” button at the bottom of the screen.
Android SDK Manager, USB Drivers ready to update
Note: If you don’t see it, then install any packages that are pending update, close and re-open. It should then connect back to the Internet and refresh the list and make the Google USB Driver visible ready to install.
Updating the device driver
Once you have the drivers on your machine, the next step is to update the driver back in the device manager.
Update Driver in Device Manager
Choose to browse the computer and go back to the PlatformSDKs folder (path above) and choose to search sub folders.
Set path to find Android SDK for Appmethod / RAD Studio
If you have not already said to “always trust” google inc. You should see immediately be asked to confirm installing the driver.
Confirm Install
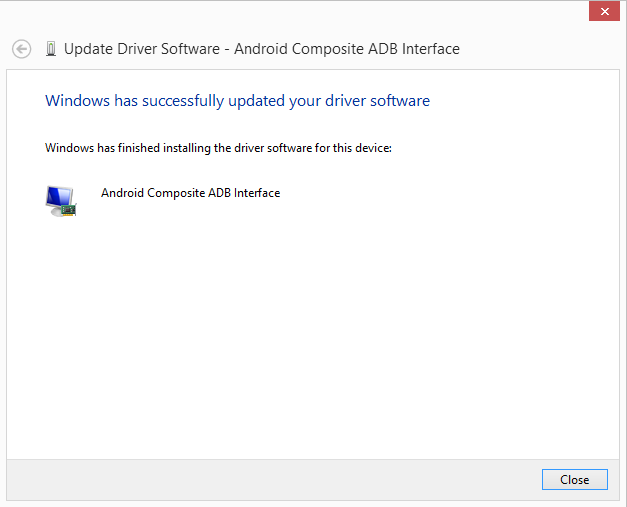
Once installed the Android Composite ADB Interface driver will be installed and you will get confirmation.
Confirmed, Driver Installed
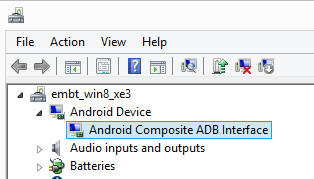
At this point, you should be able to see in the device manager the device is installed.
Android Device Installed
With the phone drivers installed, it is now time to check the ADB command line can see your device. If it can, then you are ready to use it for development.
Checking ADB can see your Android device
To check that ADB can see your device, its time to head back to the command line and run the ADB application. ADB.exe lives in the ..sdk\platform-tools folder. From the command line you should be able to get there with something like…
cd \Users\Public\Documents\Embarcadero\Studio\14.0\PlatformSDKs\adt-bundle-windows-x86-20131030\sdk\platform-tools
Once your command prompt window is open at Platform Tools, run the following command to view the connected devices.
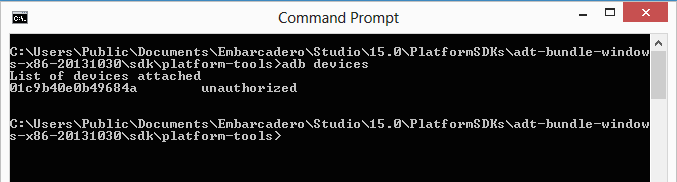
adb devices
The following screen below shows the output. Here I have my android device connected, but as yet I have not confirmed the connection on my phone as being allowed This causes the device to show as unauthorized.
Un-authroised Device
If the android device shows as unauthorized then unlock the phone and choose to Allow USB debugging.
Approving Debugging for Android
Once the device is approved, you should be able to re-run the ADB devices command and see the device id nows shows the status of “device”
ADB for approved device
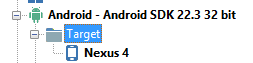
At this point you are ready to use your android device for development! Refresh your Android devices in your IDE (right click on Android as a Target platform in the Project Manager and it will become visible.
Ever wanted to select specific rows from a dataset? Well InterBase has some very cool features in the SQL syntax that allows you to do just that!
Paging Data
Adding the ROWS command to the end of your SQL statement (as per the example below) will return a specific number of records. For examples, to fetch the first 10 records just add rows 10.
Select * from MyTable
rows 10;
When you want to get the next 10 records you can use the extended syntax with the “to” command.
Select * from MyTable
rows 11 to 20;
The second query can obviously be used to fetch records 1 to 10 as well and is very useful when combined with a parameterised query to allow restful paging of data sets.
Fetching Page Headers
Now, say you wanted to get the first record of every page of data, you can also easily do this by adding an additional optional parameter “by” for example
Select * from MyTable
rows 1 to 100 by 10;
The above statement would return records 1, 11, 21, 31 etc… for the total records up to 100th record.
You can also skip records to return by a percentage of the dataset result size by simply adding “PERCENT” to the end of the above statement.
Select * from MyTable
rows 1 to 100 by 7 PERCENT;
Getting the top 10
But what if you want to use ROWS to get the top 10? Well, you can easily select 10 records, but what if the 11th and 12th record have the same value as the 10th? They should be returned as well, but how?
InterBase supports this easily by adding “WITH TIES”. To use “WITH TIES” you also need to include an “ORDER BY” clause to indicate what field to measure the ties on. For example, to get the top 10 sales people by a field storing the sales_booked, you could run the following statement.
Select * from salespeople
order by sales_booked desc
rows 10 with ties;
This will include the top 10 and also anyone with sales_booked matching the 10th record.
Getting the first 10 percent
Following on, the first 10% of records can be returned by using the following syntax.
Select * from salespeople
rows 10 percent;
While getting 10% of records is a nice feature, combining this with the “ORDER BY” and “WITH TIES” makes a very easy way to select the top 10% of sales people (for example) rather than the top 10.
Summary
There are some very cool features in the InterBase language for defining the specific size and scope of data to return that lend itself nicely to a range of useful implementations around statistics and restful data service development.
Its very easy to create a drop down list using the TComboBox to select a single item, but how can you easily select multiple items from a list across iOS and Android? Once easy way is to use the TListView component in EditMode. To view an example of this, add a TListView to a new form and using the FormCreate add in 20 items using a simple loop.
procedure TForm1.FormCreate(Sender: TObject);var
I: Integer;begin
ListView1.BeginUpdate;tryfor I := 1 to 20 do
ListView1.Items.Add.Text := I.ToString();finally
ListView1.EndUpdate;end;end;
Also note the use of BeginUpdate and EndUpdate using the Try Finally block to speed up the processing. This prevents the ListView from redrawing between each item add.
Now using two buttons we can add on click events to see how to toggle the EditMode..
Each TListViewItem has a Checked property that can be queried to discover if the item is selected. Again using a simple look it is possible to check each item and then add it to a list that we will show.
Ever wanted to take an Object into a format that is easily persisted and back? Well now you can. New in XE6 is the REST.JSON unit. This allows you access to TJSON a class with some very helpful class methods. Using TJSON you can convert an object to a JSON string and back with a little help from generics along the way.
The following code uses a class called TFoo that has a Foo and a Fee property (string and Integer) Using TJson you can then see how to covert the object to a string and back ready for storage, transport etc.
This website uses cookies to improve your experience. We'll assume you're ok with this, but you can opt-out if you wish.AcceptRead More
Privacy & Cookies Policy
Privacy Overview
This website uses cookies to improve your experience while you navigate through the website. Out of these, the cookies that are categorized as necessary are stored on your browser as they are essential for the working of basic functionalities of the website. We also use third-party cookies that help us analyze and understand how you use this website. These cookies will be stored in your browser only with your consent. You also have the option to opt-out of these cookies. But opting out of some of these cookies may affect your browsing experience.
Necessary cookies are absolutely essential for the website to function properly. This category only includes cookies that ensures basic functionalities and security features of the website. These cookies do not store any personal information.
Any cookies that may not be particularly necessary for the website to function and is used specifically to collect user personal data via analytics, ads, other embedded contents are termed as non-necessary cookies. It is mandatory to procure user consent prior to running these cookies on your website.