In this post, Tag properties and using Rtti.TValue data property as an alternative in FireMonkey / FMX.
Click / Select… now what?
One common challenge we face as developers is that the user clicks on something, we now need to find the object that is required to do the next task based on the item selected.
Sometimes this is from a dataset linked to the control and it may be taken care of for us, other times, we may need to find a specific object that then has the data we need.
Most of us have done it at some time….
Yes… that naughty little trick of using the tag property of a TComponent to store a pointer to an instance of an object that you want a quick way of reaching.
I remember doing this in a POS system where buttons that represented different stock items were linked to dynamically created screens. I also remember often using the TListView and thankfully, the TListViewItem in VCL had a Data property (of type Pointer) that you can set at runtime to an instance of an object. This was a little less naughty when moving to 64bit coding when Integer and Pointer all of a sudden became different sizes, (and if it wasn’t for some insight from the Delphi team to swap tag to NativeInt – lots of code would have broken).
The problem with a pointer property (or using a NativeInt to achieve the same goal) is that it leaves a lot of typecasting in your code, which never sat easy with me.
I’m sure some of you have seen the new Delphi, C++ and InterBase community platform that is being developed at Embarcadero. If not I would highly recommend a visit.
The Embarcadero Community is the new home to blogs, event diaries, latest news and features articles. While the old locations are still working, over time expect to see more and more on the community. Community is also social media ready with links for Facebook, Twitter, linkedIn and Google+
FireDAC is the Universal Data Access library for developing applications for multiple devices, connected to enterprise databases.
Starting tomorrow you can join the embarcadero team for free FireDAC training online in these special sessions, where you will be taken from a beginner to an expert by showing you how to utilise FireDAC in multiple situations.
Having used multiple database technologies over the years of developing with Delphi, I have been exceptionally impressed by the raw power of FireDAC and how fast and easy it makes the most difficult jobs as a database developer.
The sessions run every Thursday from Jan 22-Mar 26 in 3 time zones so no excuse for missing out!
The XML Dom defines which engine in essence is used to work with your XML documents.
Should I read on? Well if your using SOAP or XML in your projects, then this could make a difference to your speed and performance of the applications, and it takes seconds to implement.
The C++ programming version demo’ed requires the data module from the Object Pascal code, so once I’ve cleaned that up I’ll post that as well.
The IBLite example code works on Windows, Mac OS X, iOS and Android. The session replays are available online via the CodeRage website. – More on the InterBase sessions in my previous post
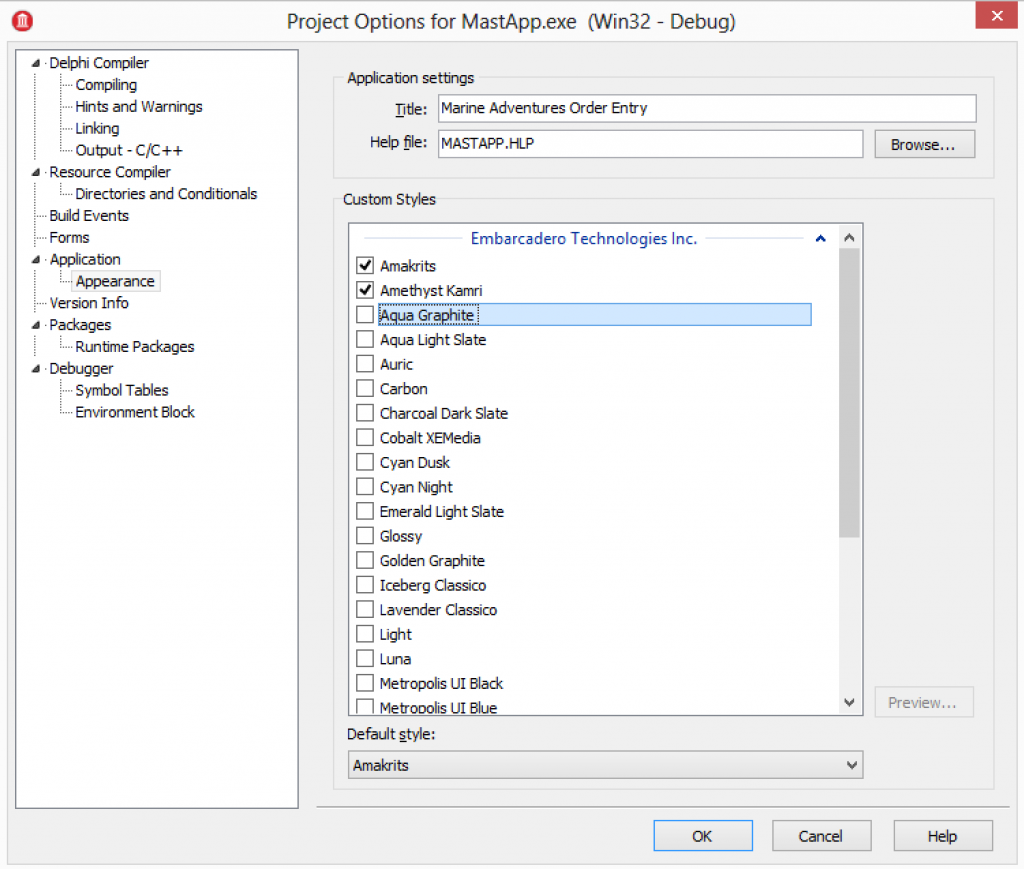
VCL Styles provide a great way to update the look and feel of your VCL applications. VCL Styles can be easily added into an application before you compile through project options > appearance options.
Adding VCL Styles via Project : Options : Appearance
While you can add VCL Styles into the application binary this way, they will increase the size of the application. If you want to avoid this, (or maybe run a mix of compiled in and dynamically loaded) you can distribute styles along side your application.
By default, VCL Styles are located at the following file path when installing your IDE.
Styles are managed via TStyleManager, a class located in unit VCL.Themes.
TStyleManager is a sealed class with a number of class methods that allow you to interact with the global application settings for the styles.
Some key properties on TStyleManager
TStyleManager.StyleNames – an array of the styles available in the application.
TStyleManager.SetStyle(StyleName : string) – the call to set the application style to a new style
Using these basic methods, its possible to implement code that loops the styles in the application and makes them available to a menu that can then be used at run time to choose which style is selected.
TStyleManager.IsValidStyle(FileName: string) – checks a file is a valid style
TStyleManager.LoadFromFile(FileName : string) – loads a style up from file.
With the additional file based calls its possible to check for style files and load those into your application as well. – So lets do that!
VCL Styles code example
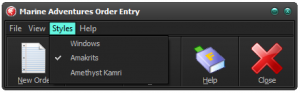
The MastApp demo that is installed by default with RAD Studio has an example of using TStyleManager. You can find the demo at:
This demo uses 2 code parts and 1 design time selection element to provide styles in the demo.
Part 1 – Compiling VCL Styles into your application.
Open the project and then choose Project > Options and go to appearance. As above, select a couple of styles and run the application. You will then see the Styles menu is updated to show these styles.
The initial code to build the menu loops the StyleNames, creates a menu item for each style, adds then links to an OnClick event to change the style.
Part 2 – Building the style list menu
procedure TMainForm.FormCreate(Sender: TObject);
var
Style: String;
Item: TMenuItem;
begin//Add child menu items based on available styles.for Style in TStyleManager.StyleNames dobegin
Item := TMenuItem.Create(StyleMenu);
Item.Caption := Style;
Item.OnClick := StyleClick;
if TStyleManager.ActiveStyle.Name = Style then
Item.Checked := true;
StyleMenu.Add(Item);
end;
end;
Step 3 – OnClick event for the Style selected.
procedure TMainForm.StyleClick(Sender: TObject);
var
StyleName: String;
i: Integer;
begin//get style name
StyleName := StringReplace(TMenuItem(Sender).Caption, '&', '',
[rfReplaceAll, rfIgnoreCase]);
//set active style
TStyleManager.SetStyle(StyleName);
//check the currently selected menu item
(Sender as TMenuItem).Checked := true;
//uncheck all other style menu itemsfor I := 0 to StyleMenu.Count -1 do beginif not StyleMenu.Items[i].Equals(Sender) then
StyleMenu.Items[i].Checked := false;
end;
end;
So: We have styles working, but you can also load them from file with very little change to the application.
Loading Styles from file and displaying them in the list of styles
VCL Styles can be loaded at run time easily using TStyleManager.LoadFromFile
Using the existing demo, its possible to have it check for a styles sub folder and read any file in there to see if its a valid style. To do this, we just need to use FindFirst, iterate the returned files and then if they are valid (something we can use TStyleManager.IsValidStyle to determine) load the files.
So the updated code looks something like this block below where we first build the path to check for VCL Style files; then check the folder exists, and if it does check each file to see if its a valid VCL Style (before loading it). Secondly, using a TStringList the styles loaded are sorted and then the sorted list is used now to build a menu for selecting the styles.
procedure TMainForm.FormCreate(Sender: TObject);
var
Style: String;
Item: TMenuItem;
i: integer;
searchResults : TSearchRec;
SearchDir: string;
SLStyles: TStringList;
begin
SearchDir := ExtractFilePath(ParamStr(0))
+'styles'+ PathDelim;
if DirectoryExists(SearchDir) thenbeginif FindFirst(SearchDir+'*.*',
faAnyFile - faDirectory,
searchResults) = 0 thenrepeattryif TStyleManager.IsValidStyle(
SearchDir+searchResults.Name) then
TStyleManager.LoadFromFile(
SearchDir+searchResults.Name);
except// Who cares.. try the next one.end;
until FindNext(searchResults) <> 0;
end;
// Sort the styles using a StringList
SLStyles := TStringList.Create;
try
SLStyles.Duplicates := TDuplicates.dupIgnore;
for Style in TStyleManager.StyleNames do
SLStyles.Add(Style);
SLStyles.Sort;
PMStyles.Items.Clear;
// build menu from sorted list of stylesfor Style in SLStyles do begin
Item := TMenuItem.Create(StyleMenu);
Item.Caption := Style;
Item.OnClick := StyleClick;
if TStyleManager.ActiveStyle.Name=Style then
Item.Checked := true;
StyleMenu.Add(Item);
end;
finally
SLStyles.Free;
end;
end;
Thats it! You can now create a sub folder for VCL styles that you ship along side your application or deploy at a later point.
For C++ use the same classes and units, just with the C++ Loops and constructs. more on VCL Styles with C++ can be found on docwiki
Free series of mobile development lessons for Android and iOS based on C++ and Object Pascal.
Earlier in the year the 2nd edition of the mobile development summer school was run by David I and Jim McKeeth. It was great fun doing the first edition and its amazing to see how some of the tech has moved on further in the year since we first ran summer school. This years was more popular than ever and has been made available on YouTube
When developing software for multiple platforms you often need to debug and run applications on machine and devices that are not your development PC. The RAD Studio and Appmethod approach to this is an ingenious little program that acts as a go-between from the IDE to the remote device / machine. Called PAServer (PA = Platform Assistant) allows the IDE to retrieve the full call stack at run time, pause code with break points, inspect values etc, exactly as you would do debugging a local application.
PA Server is often used on a Mac OS X target for running and debugging applications to Mac OS X, iOS Simulator and iOS Devices, however there is also a windows version of PAServer and this can also be used to simplify preparing for deployment.
PA Server runs over TCP/IP and while developers often use it for local network work, in theory there is no reason why you can not use it to remote debug that trouble some customer where you can’t quite recreate what they are doing. (as long as they are happy for you to install the PA Server client on their machine).
PA Server is also great for deploying files directly to a remote machine when used with the Deployment Options for the project. This ensures that all the files specified are pushed remotely. This is great for updating a remote server or internal build machines.
Installation of PAServer
PA Server needs to be installed on the machine you want to run applications on remotely The install files both Windows and Mac OS X are located in the PAServer folder under your Appmethod / RAD Studio / Delphi / C++ Builder installation. e.g. with RAD Studio XE7 they are located at C:\Program Files (x86)\Embarcadero\Studio\15.0\PAServer.
Both installers (Windows / Mac OS X) just require you to push the next button a few times to install the server.
Running PA Server remotely…
PA Server is ultimately a Console application that you launch, enter a session password (that remote developers will need to connect to the session) and leave running without having to go back to it, but this is how to launch it on each platform.
..on MAC OS X
To launch PAServer on a Mac you have two choices.
Go to “Applications” and choose PAServer 15.0 (for XE7)
Use the new GUI in LaunchPad called PAServer Manager
If you use PAServer Manager you will see the icon appear at the top of your screen in the menu bar. Clicking on this allows you to “Add Server” (I just call it MyMac by default) and then start and stop the services as well as other useful things like viewing the information (such as IP Address etc). A lot easier than remembering command codes.
PA Server Manager is also useful for managing groups of developers who want to run multiple instances of PA Server on the same machine when developing.
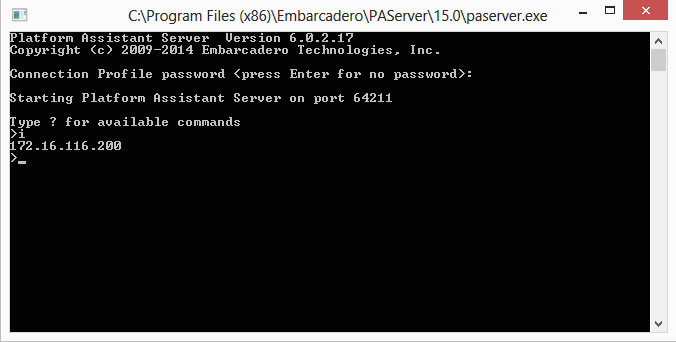
..On Windows
To launch PA Server on windows once installed, you need to browse to the PAServer folder (typically C:\Program Files (x86)\Embarcadero\PAServer\15.0) and double click on the PAServer application.
PAServer running on Windows
Connecting to PAServer running on a Windows machine from the IDE
With PA Server installed, opened and a password set for the session, it is possible to make the remote connection (or even a loopback for a more advanced local test). To achieve this we need to configure a profile for connecting to the remote PAServer instance. – this is really quick to do.
Firstly select the desired compilation target of Win32 or Win64 in the Project Manager, and then right click and choose properties. The platform properties window is then opened allowing you to choose a profile for the target.
By default you will need to choose “Add New…” under platforms the first time you run this step, subsequently you will already have the profile saved.
Following the wizard for Add New, you can enter a name (e.g. MyPC) and then the IP address (port 64211 should be default unless you have changed it during install). Once you have the IPAddress or pc name entered you can “Test Connection” to verify that the path is working correctly.
If this fails then check you IP Address is correct – if unsure type “i” into the PAServer console and hit enter to get a list of the listening IPAddresses and check your firewall.
Once you have selected the Platform Profile and its tested, all you need to do is hit run just like before. Rather than deploying to your project directory, deploying to PA Server sends out all the files into a the PAServer scratch directory (under Documents\PAServer) e.g. C:\Users\Steve\Documents\PAServer\15.0\scratch-dir\
Tip for making things simple?
If you have selected any feature files or added your own files under Deployment Options when developing your applications, e.g. enabling InterBase, IBLite or DBExpress etc. These files will be packaged up for you when running out to PAServer giving you a complete folder structure with files ready for packaging. This also makes testing locally a lot lot simpler 🙂
Getting back to normal
Once you are done testing against a remote profile you can easily return to running locally by right clicking on the target and choosing to Revert to Default Connection.
Programming with Delphi & InterBase
This website uses cookies to improve your experience. We'll assume you're ok with this, but you can opt-out if you wish.AcceptRead More
Privacy & Cookies Policy
Privacy Overview
This website uses cookies to improve your experience while you navigate through the website. Out of these, the cookies that are categorized as necessary are stored on your browser as they are essential for the working of basic functionalities of the website. We also use third-party cookies that help us analyze and understand how you use this website. These cookies will be stored in your browser only with your consent. You also have the option to opt-out of these cookies. But opting out of some of these cookies may affect your browsing experience.
Necessary cookies are absolutely essential for the website to function properly. This category only includes cookies that ensures basic functionalities and security features of the website. These cookies do not store any personal information.
Any cookies that may not be particularly necessary for the website to function and is used specifically to collect user personal data via analytics, ads, other embedded contents are termed as non-necessary cookies. It is mandatory to procure user consent prior to running these cookies on your website.