Often when building IoT applications there is benefit in linking to 3rd party services. e.g. Heating control systems may link to weather services to help detect external influences that may effect their operation. Typically these services are exposed via JSON and REST providing multi-platform access.
Microsoft Azure data services offer access to a wide range of datasets and services and in this blog post I will take you over my journey connecting to the Azure translator data service and achieving translation of text on Windows, Mac OS X, iOS and Android thanks to the REST components and helper classes in RAD Studio XE8.
About Microsoft Azure Translator Data
Microsoft Translator is a WEB API that enables Automatic Translation (Machine Translation) of text between any of the 50 supported languages
The Azure Translator data is used by Microsoft Office, Visual Studio, Bing and many more Microsoft products. It works over REST using a mix of JSON and XML to provide a number of services including translation and text to audio.
To use the Azure Translator data service you must be registered to use the market place and have an app registered to get the required credentials.
Once registered it uses 2 step authentication to provide a token (valid for 10 minutes from issue) that is then used for API calls. It does this with separate URLS’s for the security and the data services.
A great link to steps and URL’s (incase any change) is the Getting Started using Translator API page
Step 1) – Signing up with Microsoft Translator
As with most services, you need to be registered to use them. Documentation of signing up for Translator is found in steps 1 and 2 of this blog post.
http://blogs.msdn.com/b/translation/p/gettingstarted1.aspx
Once registered, Ensure you sign Up for the $0.00 per month option to get your free translation credits.
Step 2) Registering an App
Now you are signed up, you need to register your application. (ok we don’t have one yet, so we will just make one up for testing). To register your application for use with the Translation service visit https://datamarket.azure.com/developer/applications and choose Register.
On the registration screen you need to enter in a Client ID (no longer than 20 characters or it will not work from my experience) and also enter a name for your application and a description (anything will do as you can change it later) Finally a redirect URL (your website home page will do, its not used with the REST component setup, but is required)

At this point you will need to copy down the two parts of data I have highlighted on the reg form. The Red part is what you have typed in (Client ID) and the blue part (Client Secret) which is generated for you by Azure. These two are used to get your session token later on that allows you to talk to the API’s. – Don’t worry if you hit create before you make a note of them as you can open it back up from the applications page at a later point.
Step 3) Building the app using Azure Translation Service in Delphi
Click here for the API documentation for Azure Translator that I’ll be referencing to.
To use a REST service you first need to know what API’s the service exposes, the parameters it requires and then the response to expect. So lets start there…
With REST the API comes in the form of a URL base that then has methods (resources) appended. Each resource has parameters to define the data exchanged, but there are a few ways of passing parameters. The most typical is a URL Segment, but there are also Body and Header parameters. You achieve this easily in Delphi use the parameter property of the TRESTRequest component. (I will get to this shortly).
3.1 – Getting the access token
It is common practice with REST that there is an authorisation step that provides you a session token for subsequent calls. The first stop to using Translator is obtaining an Access Token to use with your API calls. From reading the documentation and scanning the C# example I was able to locate the Base URL,
https://datamarket.accesscontrol.windows.net/v2
and the resource for authentication
OAuth2-13
For the resource there are a number of parameters, all of them URL segment parameters and as described in the document this is a HTTP post method.
| Parameter | Description |
|---|---|
| client_id | Required. The client ID that you specified when you registered your application with Azure DataMarket. |
| client_secret | Required. The client secret value that you obtained when you registered your application with Azure DataMarket. |
| scope | Required. Use the URL http://api.microsofttranslator.com as the scope value for the Microsoft Translator API. |
| grant_type | Required. Use “client_credentials” as the grant_type value for the Microsoft Translator API. |
The first two are linked to the data that we generated when registering the application in Step 2 above while the other two always have the same, but required, values.
So now we know what to call, how do we setup the components to call this?
We are going to use 3 components.
- TRESTClient – To define where the Base URL is.
- TRESTRequest – To define the resource we want to use and the parameters we are passing
- TRESTResponse – To collect and store the reply

Adding the three components to your data module or application form should link them all together.
On the REST Client I set the base URL (see above for value) and on the REST Request I set the resource to OAuth2-13 and checked to make sure that the method was a rmPOST. Opening the Params property on the TRESTRequest I also added in the 4 parameters.

You can either set the Client ID and Client Secret in the parameter at design time, or you can define that in code using the TRESTRequest.Params.ParamByName(‘name’).value property e.g.
 RequestAuthToken.Params.ParameterByName('client_secret').Value := 'MyClientSecret';

 RequestAuthToken.Params.ParameterByName('client_id').Value := 'MyAppID';
If you set the values at design time you should be able to right click on the Request and Execute to populate the Response.content. Alternatively, call the Request.Execute at runtime.
3.2 – Finding and extracting the Token
So now we know how to ask for the token, how do we extract it and work with it? What comes back?
The documentation defines the response properties that are returned. These can be queried or using the TRESTResponse instance GetSimpleValue method.
| Property | Description |
|---|---|
| access_token | The access token that you can use to authenticate you access to the Microsoft Translator API. |
| token_type | The format of the access token. Currently, Azure DataMarket returns http://schemas.xmlsoap.org/ws/2009/11/swt-token-profile-1.0 , which indicates that a Simple Web Token (SWT) token will be returned. |
| expires_in | The number of seconds for which the access token is valid. |
| scope | The domain for which this token is valid. For the Microsoft Translator API, the domain is http://api.microsofttranslator.com. |
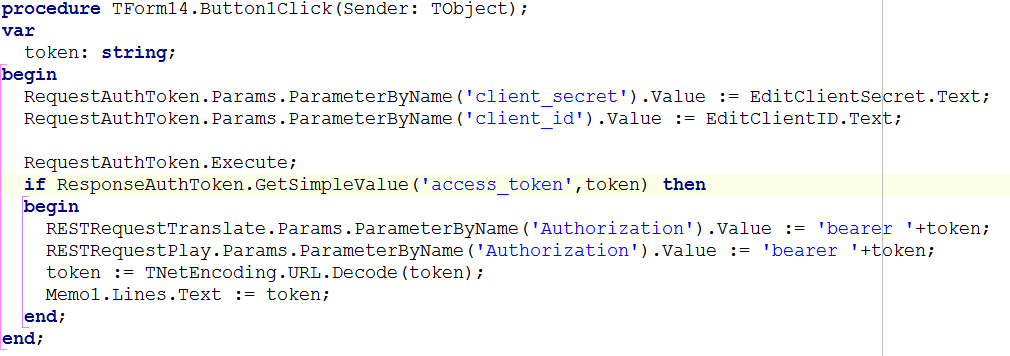
In the code example above (click to make bigger), you can see the
- Client secret and Client ID get set at run time.
- The request is executed by calling .Execute;
- The response is checked for the access_token return parameter.
- The request components that I will use to call the API’s (RESTRequestTranslate and RESTRequestPlay) now I am authorised have the returned access token set as the value for use. – I’ll cover the setup of these shortly)
New – System.TNetEncoding
The final two lines use TNetEncoding (a really useful class with class functions) to show a decoded Token. No value other than curiosity, but it does show how to decode a URL value (there is also HTML and Base64 decoding helper methods) .
I wouldn’t recommend that for a live application.
3.3 – Calling the Translate API with the Token
To recap. I have used the TRESTClient to point to the BaseURL of the service. Used the TRESTRequest to define the resource and parameters that need to be passed, set the parameters and fetched and retrieved the token, which has been set into the Authorization parameter of another TRESTRequest that I have called RESTRequestTranslate.
So there are a few things to cover here still.
- The setup of RESTRequestTranslate and its associated components, especially the parameters
- And what comes back from the Translate API
3.3.1 Component Setup to call the API with the Access token.
In a very similar way to getting the Access token, we use the same components to call the live API. Using the same process as before its possible to identify the Base URL and parameters – full list of methods here https://msdn.microsoft.com/en-us/library/ff512419.aspx
Base URL
http://api.microsofttranslator.com/v2/Http.svc
and resources I have used
Translate
to convert text from one language to another and
Speak
to create an audio file based on text passed in.
Both have separate parameter lists so I’m just going to concentrate on translate for this post, however the sample has both in there.
Because all the resources share the same base URL, the TRESTRequests can share the same TRESTClient instance. (see the green section in the diagram below.
In the documentation for the Translate API method, it defines the parameters that are required, but also the type of parameter required.
Most are segment URL values, but the authorization token must be a HTMLHeader defined as ‘bearer ‘+token.
To create the parameters for URL Segments its easy to define them as part of the resource. – see image below.

Translate?text={text}&from={from}&to={to}
The {brackets} define a parameter name when part of the resource. They automatically get added as URL segment. (or you can add them manually yourself)
Finally. Add in the Authorization token by clicking on the Add icon on the Parameters editor. Making sure to select Kind pkHTTPHEADER.
Typically Parameters are encoded automatically for us so we don’t need to mess around with encoding values, however because the token returned is already encoded, we need to set the option to DoNotEncode on the Authorization token.

So we are now all set up with the components.
In code now, we just need to set the language from and to (these are specified in the documentation or can be collected from another API call) and the text to translate. (see below – The Text is set using LiveBindings however – see further down for that setup or just do it in code)

3.3.2 – What comes out?
So here is that application at run time. I’ve selected Auth already and now choose Translate

You will see that the Response Content is actually an XML data packet. For that you can use the XML Document interfaces to extract the value, (I’ll cover that in another post) but there we have it! Translated text 🙂
Now as this is a FMX (FireMonkey) application, I can now go and use this on iOS, Android or Mac OS X as well as my local windows machine.
Translator Code Example – Download
The code I cover in this blog is available for download. however I have made it even easier to use…
Must have – BONUS DOWNLOAD
Included in the download is a set of classes I have created to
- Encapsulate fetching and managing the token (inc lifespan)
- Manage setting the parameters
- Conversion of return data from XML to text.
see Project TranslateCompsExample in the project group – enabling code like…
procedure TForm15.btnTranslateClick(Sender: TObject);
var
  Translator : TAzureTranslator;
  Str : string;
begin
  Translator := TAzureTranslator.Create(Self);
  try
    Translator.SourceLanguage := 'en';
    Translator.TargetLanguage := 'da';
    Translator.AccessToken := TokenManager;
    Str := Translator.Translate('Delphi Rocks!');
    memo1.Lines.Text := Str;
  finally
    Translator.Free;
  end;
end;
Get the code now, and start adding translation and playback of audio into your applications! http://bit.ly/ccAzureTranslatorDelphi
Happy Coding!
Hey,
thanks for u the introduction und your code example. There was very useful for my own App. i have picked up the classes that i need in one unit. I need this so.
My app gives me an unknown error excep on System.net.httpClient line 880.
I have done this with ur code too and i have the same problem an the same Line.
Have u a idea where the problems comes?
sry for my bad english
greetings
Alex
For all gusys who have the same problem. Rest-sourcecode can only used on C: where is delphi installed. The project must be on this Location. When your Project is saved on a network HDD. The exception Unknown Error is thrown system.net.httpClient line 880.
Thank you for your support. I found it usefull since mi `client` cant connect with the JWT Token provided.
… “however because the token returned is already encoded, we need to set the option to DoNotEncode on the Authorization token.”
This config solve my problem.